Tuesday, October 8, 2013

WebForms UnobtrusiveValidationMode requires a ScriptResourceMapping for 'jquery'. Please add a ScriptResourceMapping named jquery(case-sensitive)

If you receive the WebForms UnobtrusiveValidationMode requires a ScriptResourceMapping for 'jquery' error, put the following lines of code in the Appliction_Start method in the Global.asax.cs file

        protected void Application_Start(object sender, EventArgs e)
{
string jqueryVersion = "1.8.0";

System.Web.UI.ScriptManager.ScriptResourceMapping.AddDefinition("jquery",
new System.Web.UI.ScriptResourceDefinition
{
Path = "~/Scripts/jquery-" + jqueryVersion + ".min.js",
DebugPath = "~/Scripts/jquery-" + jqueryVersion + ".js",
CdnPath = "http://ajax.aspnetcdn.com/ajax/jQuery/jquery" + jqueryVersion + ".min.js",
CdnDebugPath = "http://ajax.aspnetcdn.com/ajax/jQuery/jquery" + jqueryVersion + ".js",
CdnSupportsSecureConnection = true,
LoadSuccessExpression = "Window.jquery"

});
}


The above lines of code registers the jQuery library with the ScripManager. This will get rid of the error, you can do the same this with jQueryUI library.

Friday, September 27, 2013

Thursday, September 19, 2013

Telerik: Why the $find Method is Not Working for RadGrid

The reason the $find method is not working for you is because the RadGrid loads on late binding. You need to get the RadGrid client object in the pageLoad() function like in the code below. After you get it you can set the global variables in the your Javascript so the other function will have access to the RadGrid object.

    <telerik:RadCodeBlock ID="RadCodeBlock2" runat="server">
<script type="text/javascript">
var radGrid = null;
var masterTableView = null;
var rgDataItems = null;


function pageLoad() {
radGrid = $find("<%= RadGrid1.ClientID %>");
masterTableView = grid.get_masterTableView();
rgDataItems = masterTable.get_dataItems();
}
</script>
</telerik:RadCodeBlock>

Tuesday, September 17, 2013

ASP.NET: Simulate a Button Click in Code Behind


In this blog, I will go over how you can simulate a button click postback.  By using the RaisePostBackEvent()  method.  Many of you probably want to do this because you wanted to refresh your GridView by faking a postback.  As you will see the two methods presented on this blog does not perform an actual postback, even though it behaves like it does.


Mark Up

    <form id="form1" runat="server">
<div>

<asp:Button ID="Button1" runat="server" OnClick="Button1_Click" Text="Button" />

</div>
</form>


Code Behind

using System;
using System.Collections.Generic;
using System.Linq;
using System.Web;
using System.Web.UI;
using System.Web.UI.WebControls;

namespace WebApplication2
{
public partial class _Default : System.Web.UI.Page
{
protected void Page_Load(object sender, EventArgs e)
{
this.RaiseEvent(this, new EventArgs());
if (!Page.IsPostBack)
{
this.Button1_Click(this, new EventArgs());
}
}

protected void RaiseEvent(object sender, EventArgs e)
{
this.RaisePostBackEvent(Button1, " ");
}

protected void Button1_Click(object sender, EventArgs e)
{
Response.Write("You've clicked " + Button1.Text + " ");

if (Page.IsPostBack)
{
Response.Write("this is a post back");
}
else if (!Page.IsPostBack)
{
Response.Write("this is not a post back");
Response.Write("<br/>");
}
}
}
}


After you run the code you will find out that both ways of doing this does not cause a post back event.

ASP.NET: Simulate a Button Click in Code Behind

In this blog, I will go over how you can simulate a button click postback.  By using the RaisePostBackEvent()  method.  Many of you probably want to do this because you wanted to refresh your GridView by faking a postback.  As you will see the two methods presented on this blog does not perform an actual postback, even though it behaves like it does.


Mark Up

    <form id="form1" runat="server">
<div>

<asp:Button ID="Button1" runat="server" OnClick="Button1_Click" Text="Button" />

</div>
</form>


Code Behind

using System;
using System.Collections.Generic;
using System.Linq;
using System.Web;
using System.Web.UI;
using System.Web.UI.WebControls;

namespace WebApplication2
{
public partial class _Default : System.Web.UI.Page
{
protected void Page_Load(object sender, EventArgs e)
{
this.RaiseEvent(this, new EventArgs());
if (!Page.IsPostBack)
{
this.Button1_Click(this, new EventArgs());
}
}

protected void RaiseEvent(object sender, EventArgs e)
{
this.RaisePostBackEvent(Button1, " ");
}

protected void Button1_Click(object sender, EventArgs e)
{
Response.Write("You've clicked " + Button1.Text + " ");

if (Page.IsPostBack)
{
Response.Write("this is a post back");
}
else if (!Page.IsPostBack)
{
Response.Write("this is not a post back");
Response.Write("<br/>");
}
}
}
}


After you run the code you will find out that both ways of doing this does not cause a post back event.

JQuery: Infinite Loop Button Click

<%@ Page Language="C#" AutoEventWireup="true" CodeBehind="Default.aspx.cs" EnableEventValidation="false" Inherits="WebApplication2._Default" %>
<!DOCTYPE html PUBLIC "-//W3C//DTD XHTML 1.0 Transitional//EN" "http://www.w3.org/TR/xhtml1/DTD/xhtml1-transitional.dtd">

<html xmlns="http://www.w3.org/1999/xhtml">
<head runat="server">
<title></title>
<script src="Scripts/jquery-1.7.1.min.js"></script>
</head>
<script type="text/javascript">

$(document).ready(function () {
$("#Button1").click();

});
</script>
<body>
<form id="form1" runat="server">
<div>

<asp:Button ID="Button1" runat="server" OnClick="Button1_Click" Text="Button" />

</div>
</form>
</body>
</html>

JQuery: Infinite Loop Button Click

<%@ Page Language="C#" AutoEventWireup="true" CodeBehind="Default.aspx.cs" EnableEventValidation="false" Inherits="WebApplication2._Default" %>

<!DOCTYPE html PUBLIC "-//W3C//DTD XHTML 1.0 Transitional//EN" "http://www.w3.org/TR/xhtml1/DTD/xhtml1-transitional.dtd">

<html xmlns="http://www.w3.org/1999/xhtml">
<head runat="server">
<title></title>
<script src="Scripts/jquery-1.7.1.min.js"></script>
</head>
<script type="text/javascript">

$(document).ready(function () {
$("#Button1").click();

});
</script>
<body>
<form id="form1" runat="server">
<div>

<asp:Button ID="Button1" runat="server" OnClick="Button1_Click" Text="Button" />

</div>
</form>
</body>
</html>

Friday, September 13, 2013

Database Reference For ADO.NET


Microsoft has some great references on ADO.NET, however finding everything you need quickly is another story.  This a quick reference of when you need to find information quickly when working with ADO.NET.

ADO.NET Data Mappings:

Oracle Data Type Mappings: http://msdn.microsoft.com/en-us/library/cc716726.aspx

SQL Server Data Type Mappings : http://msdn.microsoft.com/en-us/library/cc716729.aspx

OLE DB Data Type Mappings : https://msdn.microsoft.com/en-us/library/cc668759(v=vs.110).aspx

ODBC Data Type Mappings: https://msdn.microsoft.com/en-us/library/cc668763(v=vs.110).aspx


LINQ References:

LINQ To SQL : https://msdn.microsoft.com/en-us/library/bb386934%28v=vs.110%29.aspx

LINQ To Entity: https://msdn.microsoft.com/en-us/library/vstudio/bb386964(v=vs.100).aspx

LINQ To XML: https://msdn.microsoft.com/en-us/library/system.xml.linq.aspx

LINQ To Objects: https://msdn.microsoft.com/en-us/library/bb397919.aspx

Database Reference For ADO.NET

Microsoft has some great references on ADO.NET, however finding everything you need quickly is another story.  This a quick reference of when you need to find information quickly when working with ADO.NET.

ADO.NET Data Mappings:

Oracle Data Type Mappings: http://msdn.microsoft.com/en-us/library/cc716726.aspx

SQL Server Data Type Mappings : http://msdn.microsoft.com/en-us/library/cc716729.aspx

OLE DB Data Type Mappings : https://msdn.microsoft.com/en-us/library/cc668759(v=vs.110).aspx

ODBC Data Type Mappings: https://msdn.microsoft.com/en-us/library/cc668763(v=vs.110).aspx


LINQ References:

LINQ To SQL : https://msdn.microsoft.com/en-us/library/bb386934%28v=vs.110%29.aspx

LINQ To Entity: https://msdn.microsoft.com/en-us/library/vstudio/bb386964(v=vs.100).aspx

LINQ To XML: https://msdn.microsoft.com/en-us/library/system.xml.linq.aspx

LINQ To Objects: https://msdn.microsoft.com/en-us/library/bb397919.aspx

Thursday, September 5, 2013

C# Querying From An Oracle Database


In this blog we will go over how to query an Oracle database in ASP.NET using the System.Data.OracleClient data provider in C#.

Namespaces:

using System.Web.Configuration;
using System.Data.OracleClient;
using System.Data;

            string cs = WebConfigurationManager.ConnectionStrings["SomeConnectionString"].ConnectionString;

using (OracleConnection oc = new OracleConnection(cs))
{
oc.Open();
DataTable dt = new DataTable();
OracleCommand ocmd = new OracleCommand("SELECT * FROM SOMETABLE", oc);
OracleDataAdapter oda = new OracleDataAdapter(ocmd);

oda.Fill(dt);

GridView1.DataSource = dt;
GridView1.DataBind();

}

C# Querying From An Oracle Database

In this blog we will go over how to query an Oracle database in ASP.NET using the System.Data.OracleClient data provider in C#.

Namespaces:

using System.Web.Configuration;
using System.Data.OracleClient;
using System.Data;

            string cs = WebConfigurationManager.ConnectionStrings["SomeConnectionString"].ConnectionString;

using (OracleConnection oc = new OracleConnection(cs))
{
oc.Open();
DataTable dt = new DataTable();
OracleCommand ocmd = new OracleCommand("SELECT * FROM SOMETABLE", oc);
OracleDataAdapter oda = new OracleDataAdapter(ocmd);

oda.Fill(dt);

GridView1.DataSource = dt;
GridView1.DataBind();

}

Tuesday, September 3, 2013

Oracle Date Format And Compare


Oracle dates have a different format than SQL Server dates. So to select a date for the Oracle database you have to have the date in the following format.  
string myDate = "10/9/2012 2:55:25 PM";

string sql = "SELET * FROM SomeTable WHERE SomeDateField=" +
"to_date('" + myDate + "','" + "MM/DD/YYYY HH:MI:SS " +
myDate.Substring(myDate.Length - 2) + "');";

Oracle Date Format And Compare

Oracle dates have a different format than SQL Server dates.  So to select a date for the Oracle database you have to have the date in the following format.  

string myDate = "10/9/2012 2:55:25 PM";

string sql = "SELET * FROM SomeTable WHERE SomeDateField=" +
"to_date('" + myDate + "','" + "MM/DD/YYYY HH:MI:SS " +
myDate.Substring(myDate.Length - 2) + "');";

Telerik: The Current RadAjaxManager


RadAjaxManager ram = RadAjaxManager.GetCurrent(this.Page);

Telerik: The Current RadAjaxManager

RadAjaxManager ram = RadAjaxManager.GetCurrent(this.Page);

Sunday, September 1, 2013

ASP.NET GridView Control Part 1: Getting Started, Create GridView in Web Form

The GridView data grid control is probably the most popular and flexible data grid control in the ASP.NET arsenal.  In this tutorial we will create a new GridView data grid on a web form.

Here are the steps:

1. Click on the "Design" tab in main window of Visual Studio

Visual Studio Design Surface


2. Click on the "Toolbox" tab, then expand the "Data" node, then drag the "GridView" data control to the Design surface.  The Design Surface is the big window in the middle of Visual Studio.

Visual Studio drag GridView from Toolbox to design surface

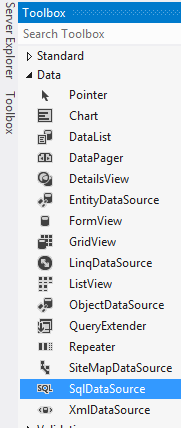
3. Click on "Toolbox" tab again, this time drag the "SqlDataSource" control to the Design Surface

SqlDataSource in Toolbox

4. Click on the ">" button next to SqlDataSource1 control, then select "Configure Data Source"
5. Click on the "New Connection" button

Configure Data Source

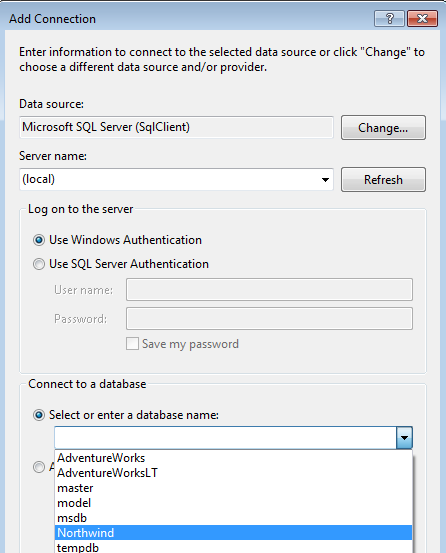
 6. Select your "Server name", SQL Server should pick up your database server automatically if it's on a local machine, but if it doesn't type in (local) in the "Server name" field.


7. Click "OK"
8. A new connection has been defined in your web application

Connection string

9. Click "Next", leave the checkbox check for the option "Yes, save this connection as:", "NorthwindConnectionString"
10. Click "Next"
11. On the "Configure the Select Statement" window select "Specify a custom SQL statement or stored procedure"
Configure the Select Statement
 12. Click "Next"
13. Click on the "Query Builder" button"
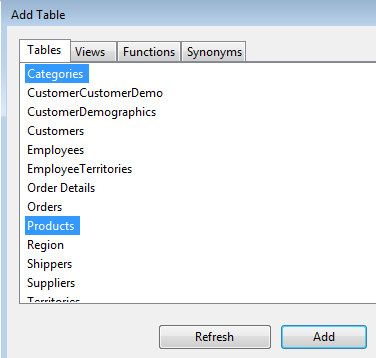
 14. On the "Add Table" window select the "Categories" and "Products" table and then click "Add", then click "Close"
Add Table in Query Builder

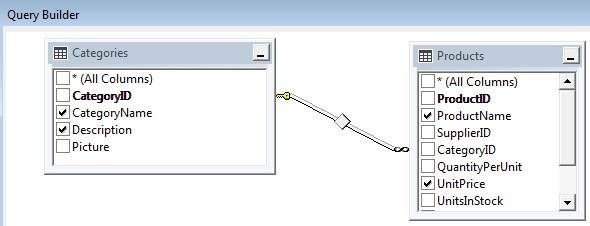
15. In "Query Builder" the two tables and their relationships are displayed

Relationships between tables in Query Builder

16. The following into the SELECT statement window

SELECT        Products.ProductName, Products.UnitPrice, Categories.CategoryName, Categories.Description
FROM            Categories INNER JOIN
                         Products ON Categories.CategoryID = Products.CategoryID

Query Builder SELECT statement window

17. Click "OK"
18. Click "Next"
19. Click "Finish"

20. Click on the ">" button next to the GridView1 control, and for the "Choose Data Source" dropdown list chose "SqlDataSource1"

Choose a Data Source for SqlDataSource control

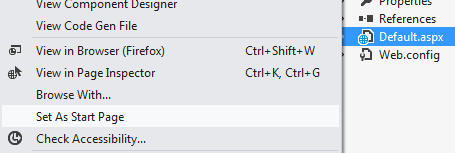
21. Right-click on the "Default.aspx" file then select "Set as Start Page"


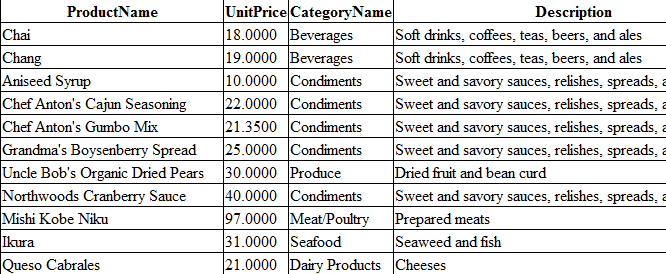
22. Press F5 to run the page, the GridView will be displayed on the browser page.

GridView products result

Source CodeGridViewWebSite.zip  to download the zip file click on File -> Download

Friday, August 23, 2013

ASP.NET: Getting The Inserted ID Back With Scope_Identity()

When you need to do an insert into multiple database table you need to the get the ID of the insert so that you could use that ID for the next insert. Here is how you would do that with the Scope_Identity()which gets the last inserted ID back to you if you execute your query with the ExecuteScalar() method.

                SqlCommand cmd = new SqlCommand("INSERT INTO Users (" +
"LoginName," +
"FirstName," +
"LastName," +
"Password," +
"Email," +
"DOB," +
"Sex" +
") VALUES (" +
"@Email," +
"@FirstName," +
"@LastName," +
"@Password," +
"@Email," +
"@DOB," +
"@Sex)" +
" Select Scope_Identity();",conn);


Here is how you would execute the query:
int UserId = (int)cmd.ExecuteScalar();


Most of the time you will need to use the Scope_Identity() when you have to deal with foreign key constraints, that's why a Users table is a good example.

Thursday, August 22, 2013

SqlDbType.Date

string dobStr = ddlMonth.SelectedValue + "/" + txtDay.Text + "/" + txtYear.Text;
SqlParameter dob = new SqlParameter("DOB", Convert.ToDateTime(dobStr));
dob.SqlDbType = SqlDbType.Date;
cmd.Parameters.Add(dob);

CSS: Padding Properties

padding: top right bottom left
padding:100px 75px 50px 25px;

Long hand version
padding-top:100px;
padding-right:75px;
padding-bottom:50px;
padding-left:25px;

All four sides 100px
padding:100px;


ASP.NET Get The Current Page File Name

In this blog we will get the current page file name that the user is currently on.
string[] currentUrl = HttpContext.Current.Request.Url.AbsolutePath.Split('/');
string pageFileName = currentUrl[currentUrl.Length-1];

Sunday, August 18, 2013

ADO.NET: Using System.Data.SqlClient.SqlDataAdapter To Fill System.Data.DataTable

In this example we will use the SqlDataAdapter to fill a DataTable then bind the data to a GridView 1. Drag a GridView into your ASP.NET page

2. Use the following code to the fill the dtProducts DataTable with the adapter SqlDataAdapter, then bind it to the GridView1 control.

        protected void Page_Load(object sender, EventArgs e)
{
DataTable dtProducts = new DataTable();

string connString = WebConfigurationManager.ConnectionStrings["NorthwindConnectionString"].
ConnectionString;

using (SqlConnection conn = new SqlConnection(connString))
{
SqlCommand cmd = new SqlCommand("SELECT * FROM Products", conn);
conn.Open();
SqlDataAdapter adapter = new SqlDataAdapter(cmd);
adapter.Fill(dtProducts);

GridView1.DataSource = dtProducts;
GridView1.DataBind();

}
}


Tuesday, August 13, 2013

How To Use AJAX Control Toolkit


1. Download the Toolkit at

http://ajaxcontroltoolkit.codeplex.com/

3. Extract the download

4. Add reference to AjaxControlToolKit.DLL

5. Register the DLL on your aspx page

<%@ Register Assembly="AjaxControlToolkit" Namespace="AjaxControlToolkit" TagPrefix="asp" %>

<!DOCTYPE html>


6. Add ToolkitScriptManager

    <form id="form1" runat="server">
<div>
<asp:ToolkitScriptManager ID="ToolKitManager1" runat="server"></asp:ToolkitScriptManager>


How To Use AJAX Control Toolkit

1. Download the Toolkit at

http://ajaxcontroltoolkit.codeplex.com/

3. Extract the download

4. Add reference to AjaxControlToolKit.DLL

5. Register the DLL on your aspx page

<%@ Register Assembly="AjaxControlToolkit" Namespace="AjaxControlToolkit" TagPrefix="asp" %>

<!DOCTYPE html>


6. Add ToolkitScriptManager

    <form id="form1" runat="server">
<div>
<asp:ToolkitScriptManager ID="ToolKitManager1" runat="server"></asp:ToolkitScriptManager>


Monday, August 12, 2013

C#: System.Collections.Generic.Dictionary

Namespace:

System.Collections.Generic

Declaration:

Dictionary<string, string> account = new Dictionary<string, string>();
Adding Items:
account.Add("id","1");
account.Add("username", "jackd");
Use in ArrayList: Namespace:

System.Collections

Add Dictionary to ArrayList:
Dictionary<string, string> account = new Dictionary<string, string>();

ArrayList aList = new ArrayList();

account.Add("id","1");
account.Add("username", "jackd");

aList.Add(account);

account = new Dictionary<string, string>();

account.Add("id","2");
account.Add("username", "janed");

aList.Add(account);

account = new Dictionary<string, string>();

account.Add("id","3");
account.Add("username", "d");


Loop Through ArrayList of Dictionary Type:
foreach (Dictionary<string, string> dic in aList)
{
Response.Write("id: " + dic["id"] + " username: " + dic["username"] + "<br>");
}

Wednesday, August 7, 2013

SQL: The NOT IN Operator

The NOT IN operator in SQL means that you are retrieving records in the database that does not match the values in a comma separated list. In other words it retrieves the inverse of the IN statement by itself. Here is an example of how you can use the IN operator in the products table in the Northwind database.
SELECT * 
FROM Products
WHERE SupplierID NOT IN (1,2)

The above example all the products will be retrieved except for products with SupplierID of 1 or 2, here are the results
SQL results from NOT IN operator

Tuesday, August 6, 2013

SQL: The IN Operator

The IN operator in SQL means that you are retrieving records in the database that matches the values in a comma separated list. Here is an example of how you can use the IN operator in the products table in the Northwind database.
SELECT * 
FROM Products
WHERE SupplierID IN (1,2)

In the above example all the products with the SupplierID of 1 or 2 are retrieved.
SQL results from IN operator query

Monday, August 5, 2013

SQL: Using Parentheses To The Expected Result

SQL Server as well as other DBMS has an order of evaluation that can throw you off. Especially when you have more than one comparison in the WHERE clause. In this example I will show you the difference between using a parentheses and not using one, and how by using parentheses can give the results that you want.  Suppose you want to get the products with CategoryID 1 and 2 that are priced less than 15 dollars in the Products table in the Northwind database. Here is the query without the parentheses:
SELECT CategoryID,ProductName,UnitPrice
FROM Products
WHERE CategoryID = 1 OR CategoryID =2 AND UnitPrice < 15

When you run the query above you would expect that all the records retrieved will have a unit price of less than $15 dollar but that is not the case. Below is the result from the query.
Unexpected results from SQL from queries without parentheses

As you can see several records have unit price that are greater than $15 dollars
Now let's run the query with parantheses
SELECT CategoryID,ProductName,UnitPrice
FROM Products
WHERE (CategoryID = 1 OR CategoryID =2) AND UnitPrice < 15

Below is the result from the query
Get expected SQL results with parentheses

Now you are getting result that you've always wanted in the first place. The parentheses tells SQL Server to ignore the order of evaluation and evaluate what is in the parentheses first then evaluate the second part of the WHERE clause.

Friday, August 2, 2013

SQL: Checking ShippedDate Column For NULL

Retrieve records with NULL value in the ShippedDate column in the Orders table in Northwind
SELECT OrderID, ShippedDate
FROM Orders
WHERE ShippedDate IS NULL

Retrieve records that is does not have NULL value in the ShippedDate column in the Orders table in Northwind
SELECT OrderID, ShippedDate
FROM Orders
WHERE ShippedDate IS NOT NULL

Thursday, August 1, 2013

SQL: SELECT Rows Between Certain Dates

Let's say you want to know the orders that takes place in the Northwind database table Orders tables that occurs during the Christmas Eve 1997-12-24 and the New Years Day the following year in 1998-01-01. Here is the SQL to query the OrderID between those date range:
SELECT OrderID, OrderDate
FROM Orders
WHERE OrderDate BETWEEN '1997-12-24' AND '1998-01-01'

Tuesday, July 30, 2013

ASP.NET Populate The DropDownList Control With The Northwind Categories Table

The Categories table is a perfect example of how sometimes you have to populate the DropDownList control to data from the database. In this example we will populate the DropDownList control to the Categories table in the Northwind database.

 1. Drag the DropDownList control into a .aspx page.
DropDownList Control

Make sure you check "Enable AutoPostBack" 2.  In your C# code file you need the namespaces

using System.Web.Configuration;
using System.Data.SqlClient;
using System.Data;

2. Then get the Northwind connection string value from the Web.config file
string connectString = WebConfigurationManager.ConnectionStrings["NorthwindConnectionString"].
ConnectionString;

3. Type in the following code in the Page_Load method
        protected void Page_Load(object sender, EventArgs e)
{
if (!Page.IsPostBack)
{
using (SqlConnection conn = new SqlConnection(connectString))
{
SqlCommand cmd = new SqlCommand("SELECT CategoryID, CategoryName
FROM Categories ORDER BY CategoryName", conn);
conn.Open();
SqlDataReader reader = cmd.ExecuteReader();

DropDownList1.DataValueField = "CategoryID";
DropDownList1.DataTextField = "CategoryName";
DropDownList1.DataSource = reader;
DropDownList1.DataBind();

reader.Close();

}
}
else
{
Response.Write("Selected item is " + DropDownList1.SelectedItem.Text + "<br>");
Response.Write("Selected id is " + DropDownList1.SelectedItem.Value + "<br>");
}
}
}

The line "if (!Page.IsPostBack)" is very important because if you don't have it you will never get the selected value. When you "Enable AutoPostBack" on the Designer view you tell ASP.NET to post back the page every time there is a change in the DropDownList1 control. So the block of code only executes once to populate the drop down list, after that only the "else" block is executed.

Monday, July 22, 2013

T-SQL: Stored Procedures (SELECT), SELECT By ID, Select Products by Supplier ID

In this example we will pass an input parameter to determine the result of the query.  We will pass in supplier id to get all the products that are provided by the supplier.

Here is the code
Use Northwind
GO
CREATE PROCEDURE dbo.selProductsBySupplierID
@SupplierID int
AS
SELECT DISTINCT p.ProductID,
p.ProductName,
p.UnitPrice
FROM Products p
INNER JOIN Suppliers s ON
p.SupplierID = @SupplierID
GO

The @SupplierID is the input parameter that the stored procedure expects, you use it in the join portion of the statement to match the SupplierID in the Products table. The DISTINCT keyword means that the query will only return one row in the result if there are duplicate rows.
Type the following to execute the stored procedure with the supplier id of 1
EXEC dbo.selProductsBySupplierID 1

The result should look like this
Select Northwind Product Results From T-SQL Select

Wednesday, July 17, 2013

ASP.NET: Call Stored Procedure Using SqlCommand and SqlDataReader

A lot of times you want to call a stored procedure quickly in the code to access the stored procedure.  You don't want to go through the trouble of dragging an SqlDataSource control in the design view just to use the stored procedure.

Here is how you would call the "Top Ten Most Expensive Products" stored procedure in the Northwind database.

1.  First you need the namespaces

using System.Web.Configuration;
using System.Data.SqlClient;
using System.Data;

2. Then get the Northwind connection string value from the Web.config file
string connectString = WebConfigurationManager.ConnectionStrings["NorthwindConnectionString"].
ConnectionString;

3. Now call the stored procedure and output the result from the SqlDataReader
  using (SqlConnection conn = new SqlConnection(connectString))
{
conn.Open();
SqlCommand cmd = new SqlCommand();
cmd.CommandText = "GetProductsAvgPrice";
cmd.CommandType = CommandType.StoredProcedure;
cmd.Connection = conn;
Response.Write("Products Average Price is $" + (decimal)cmd.ExecuteScalar());
}

In the above code the ExecuteScalar() method executes a call to the stored procedure called "GetProductsAvgPrice" which uses the aggregate function AVG() to get the average products price. The only thing you have to watch out for is that you have to convert the type to the appropriate type if you want to use it. Since currency is of type decimal you want to use the result into a decimal value because the ExecuteScalar() method returns an object type.

Tuesday, July 16, 2013

ASP.NET: Programmatically Connect to The Database Using SqlConnection, DataReader and SqlCommand

So you have following connection string to the Northwind database in your Web.config and you want to connect to the database in the code behind instead using query builder.

  <connectionStrings>
<add name="NorthwindConnectionString" connectionString="Data Source=(local);
Initial Catalog=Northwind;Integrated Security=True" providerName="System.Data.
SqlClient"/></connectionStrings>

Here is how you would do it

1. Get the connection from the Web.config file programmatically, you can look at this blog to find out how perform this step by step.  But here is the code to get the connection string from the Web.config file

string connectString = WebConfigurationManager.ConnectionStrings["NorthwindConnectionString"].
ConnectionString;

2.  On the top of the file specify that you want to use the Sql.Data.SqlClient namespace by typing

using System.Data.SqlClient; 

3. Now type the following

 using (SqlConnection conn = new SqlConnection(connectString))
{
conn.Open();
SqlCommand cmd = new SqlCommand("SELECT ProductID,ProductName FROM Products", conn);
SqlDataReader dataReader = cmd.ExecuteReader();

try
{
while (dataReader.Read())
{
Response.Write("Product ID: " + dataReader["ProductID"] + dataReader["ProductName"] +
"<br>");
}
}
finally
{
dataReader.Close();
}

}
}
By using the "using" keyword you assure that the connection is automatically closed after the code is executed inside the using code block. So you don't have remember to close the connection string.
        using (SqlConnection conn = new SqlConnection(connectString))
Then you open the SqlConnection with
        conn.Open();

Then you create a new SqlCommand using the connection you've just opened
SqlCommand cmd = new SqlCommand("SELECT ProductID,ProductName FROM Products", conn);
Then to execute command to retrieve the data object SqlDataReader which will store your result in a read-only forward only stream of database rows.
            try
{
while (dataReader.Read())
{
Response.Write("Product ID: " + dataReader["ProductID"] +
dataReader["ProductName"] + "<br>");
}
}
finally
{
dataReader.Close();
}

The while loop loops through the reader until there is no more rows to read and print out the ProductID, and ProductName of each database row. Make sure you always use the SqlDataReader in a try block and always remember to close it since, it's a data stream.
This is a quick and easy way to query the database.

Monday, July 15, 2013

ASP.NET: Set Up SQL Server for ASP.NET Provider Databases

Out of the box the ASP.NET provider databases works with the local database file call aspnetdb.mdf, however in a production environment you cannot use this file because you need to work with the production database. To create the provider databases on a full version of SQL Server perform the following steps.

1. Navigate to the .NET Framework version that you want to use. Version 4.5 and Version 2 has the provider database wizard. I am using version 4.5 so the path is C:\Windows\Microsoft.NET\Framework\v4.0.30319

2. Double click on the file aspnet_regsql.exe, the ASP.NET SQL Server Setup Wizard will apear, click "Next" to continue

ASP.NET SQL Server Setup Wizard

3.  Select "Configure SQL Server for application services" radio button, then click next

Configure SQL Server for application services

4. Type in the database server name in the "Server:" field.  Make sure you type in the actual host name because if you type in (local) or localhost the database creation process will fail.   Leave the option as "Windows authentication" checked, unless you want to use SQL Server authentication.  Then click "Next" to continue.

Windows authentication

5.  Click next on the confirmation screen


6.  When the database has been successfully created you will see the message that says "The database has been created or modified"

The database has been created or modified

7. If you look at the Microsoft Management Studio you will see the aspnetdb database in the list of databases.

aspnetdb database in the list of databases

Now you have the databases necessary to work with the ASPNET provider services.  However, you still need to change the configuration file maching.config in the .NET folder in order for .NET to recognize that the database is available in the SQL Server database now or the web.config file in your web application.  The best practice is to change it in your web application so that it only affects your web application.  If you change the configuration in machine.config file you will change to for all the applications.

This example shows you how to use the AspNetSqlMembershipProvider

1. First add the connection string to the database, make sure you have the <clear/> tag right below the <connectionStrings> opening tag


  <connectionStrings>
<clear/>
<add name="aspnetdbConnectionString" connectionString="Data Source=(local);
Initial Catalog=aspnetdb;Integrated Security=True"
providerName="System.Data.SqlClient" />
</connectionStrings>

2. Now above the </system.web> tag type in the following

       <membership defaultProvider ="AspNetSqlMembershipProvider">
<providers>
<add name="AspNetSqlProfileProvider" connectionStringName="aspnetdbConnectionString"
applicationName="/" type="System.Web.Profile.SqlProfileProvider,
System.Web, Version=4.0.0.0, Culture=neutral, PublicKeyToken=b03f5f7f11d50a3a" />
</providers>
</membership>
Note: To make sure you have the right provider settings copy the declaration from your machine.config file and then just change the "connectionStringName" attribute.

Thursday, July 11, 2013

ASP.NET Configurations: Retrieve Multiple Connection Strings From The Current Web Application's Web.config File

So you have to work with multiple connection strings that you want to use in the Web.config file and you want to use it in the code behind file.    Below are the steps to retrieve multiple connection strings in the web.config file programmatically.

1. Make sure you have connection strings in your Web.config file.  A connection string looks something like this.

  <connectionStrings>
<add name="NorthwindConnectionString" connectionString="Data Source=(local);
Initial Catalog=Northwind;Integrated Security=True"
providerName="System.Data.SqlClient" />
<add name="AdventureWorksConnectionString" connectionString="Data Source=(local);
Initial Catalog=AdventureWorks;Integrated Security=True"
providerName="System.Data.SqlClient" />
</connectionStrings>


2. Now in the Default.aspx.cs file type in the following in the top of the file, where all the using statements are to use the System.Web.Configuration namespace

using System.Web.Configuration;
using System.Configuration;

Obviously you can use it in any .cs file, the Default.aspx.cs is just an example.


3. In the Page_Load method type in the following line
ConnectionStringSettingsCollection connectStrings = WebConfigurationManager.ConnectionStrings;

foreach (ConnectionStringSettings cstr in connectStrings)
{
Response.Write(cstr.ConnectionString + "<br>");
}

Or you can just do this and you don't have to assign WebConfigurationManager.ConnectionStrings to a variable at all. A lot less typing.
        foreach (ConnectionStringSettings cstr in WebConfigurationManager.ConnectionStrings)
{
Response.Write(cstr.ConnectionString + "<br>");
}

If you run the code you will get the following

data source=.\SQLEXPRESS;Integrated Security=SSPI;AttachDBFilename=|DataDirectory|aspnetdb.mdf;User Instance=true

Data Source=(local);Initial Catalog=Northwind;Integrated Security=True
Data Source=(local);Initial Catalog=AdventureWorks;Integrated Security=True

Notice the attached SQLEXPRESS file aspnetdb.mdf file in your results, well it's because there's a
hierarchy in the Web.Config file and before .NET even look at the current Web.config  in your web application it looks in the .NET Framework install folder for the default Web.config file, this file is call the "Root Web" configuration level .  That's why the first item in the ConnectionStringSettingsCollection is not Northwind.

If you just want the current web applications Web.config connection strings section all you have to do is add the <clear/> tag right below the <connectionsStrings> opening tag in the current web application's Web.config file, like the xml code below.

  <connectionStrings>
<clear/>
<add name="NorthwindConnectionString" connectionString="Data Source=(local);
Initial Catalog=Northwind;Integrated Security=True"
providerName="System.Data.SqlClient" />
<add name="AdventureWorksConnectionString" connectionString="Data Source=(local);
Initial Catalog=AdventureWorks;Integrated Security=True"
providerName="System.Data.SqlClient" />
</connectionStrings>

The <clear/> tag tells .NET to remove all of the inherited configuration information and just use the configuration of the current web application.  So now the result will be

Data Source=(local);Initial Catalog=Northwind;Integrated Security=True
Data Source=(local);Initial Catalog=AdventureWorks;Integrated Security=True

Which is what you really wanted in the first place.

Wednesday, July 10, 2013

ASP.NET Configurations: Retrieve Connection String Programmatically

So you have a connection string that you want to use in the Web.config file and you want to use in the code behind file.  You can do that with a single line of code in your .cs file.  Below are the steps to retrieve a connection string in the web.config file programmatically.

1. Make sure you have a connection string in your Web.config file.  A connection string looks something like this.

  <connectionStrings>
<add name="NorthwindConnectionString" connectionString="Data Source=(local);
Initial Catalog=Northwind;Integrated Security=True"
providerName="System.Data.SqlClient"/>
</connectionStrings>


2. Now in the Default.aspx.cs file type in the following in the top of the file, where all the using statements are to use the System.Web.Configuration namespace
using System.Web.Configuration;
Obviously you can use it in any .cs file, the Default.aspx.cs is just an example.


3. In the Page_Load method type in the following line
    string connectString = WebConfigurationManager.ConnectionStrings["NorthwindConnectionString"].
ConnectionString;
To display the connection string on your browser, type the following line
Response.Write(connectString);

Tuesday, July 9, 2013

ADO.NET: SqlDataSource Control

The SqlDataSource control provides you with a quick and easy way to access database data.  Most of the time you don't even have to write a single line of code.  Now this can a be a good thing and a bad thing, depends on how you look at things.  Most of the configuration and querying is performed via a configuration wizard.

Here are the steps to creating a SqlDataSource:

1. In a ASP.NET project/web site drag a SqlDataSource control in under "Data" in the "Toolbox" tab into a .aspx page.


After you dragged the control it should look like this on your .aspx page

SqlDataSource

2. Click on "SqlDataSource1" control, then click on the ">" sign, a slide out menu appears.  Select "Configure Data Source".

Configure Data Source

The "Configure Data Source" wizard will pop up.


Choose Your Data Connection

3. Click on the "New Connection" button, the "Add Connection" wizard will pop up. Select or type in your "Server name".  If you have a local instance of SQL Server, then you can type in "(local)" in the "Server name" field.  Leave the authentication method under "Log on to server" as "Windows Authentication"

Add Connection

The database in your SQL Server should be automatically populated, once you input the server name of database server in the "Server name" field.  Type in, or select the "Northwind" database.  You can test the connection by clicking on "Test Connection".  Once the connection is successful, click on the "OK" button.


4.  In the next step of the wizard a new connection has been created, and the connection string displayed.  Click "Next"

connection string

5.  In the next step the wizard will ask if you want to store connection string in the Web.config file.  Leave the checkbox checked, then you can change the name of the connection string in the text field.  Click "Next"

6.  At this point you have two options, either you can write your own SQL statement or stored procedures or specify the columns in a database table.  I always choose the first option which is "Specify a custom SQL statement or stored procedure" because in the next screen you will be given more options, and have the ability to work with more than one table.  You can still work with a single table if you choose this option, so it gives you more flexibility. Click "Next"


Configure the Select Statement

7.  You will be given the choice to create a custom SQL statement or to select a stored procedure.  In this example we will be building a custom Sql statement. So click on the "Query Builder" button.

Query Builder

8. The "Add Table" wizard will pop up.  Select the "Categories" and "Products" table.  Then click on the "Add" button and then the "Close" button.

Query Builder Add Table

9.  The selected tables populates the Query Builder wizard, as you can see the table relationships have been transferred over.

Query Builder wizard

10.  Select the "CategoryName" and "Description" in the "Categories" table.  Then the "ProductName" in the "Products" table.  The SQL select statement will change dynamically as you select a new column from the table window.

Query Builder wizard

11.  Click on the "Execute Query" button to execute the query and see the results.  Once you are happy with the results, click the "OK" button.

Query Builder Execute Query

12.  The select statement from "Query Builder" populates the "SELECT" tab in "Custom SQL Statement or Stored Procedures" wizard.

Custom SQL Statement or Stored Procedures" wizard

13. Click "Next", then click "Finish".  You now have the SqlDataSource control configured

The next step is to bind the data in the SqlDataSource control to a UI data control.  Lets use the GridView control.

1.  Drag the GridView control under "Data" in the "Toolbox" into a .aspx page.

Drag the GridView control under "Data" in the "Toolbox"
It should look like this when you have both controls on the page.

GridView control on .aspx page


2. At this point you can either bind the data from the SqlDataSource1 control to the GridView1 control via a wizard or write a little bit of code in the .aspx code behind page.  In this example since we have been using wizards the whole time I will use the wizard.  I will write a new blog on how to bind data programmatically in the future.  To bind the data to the GridView control via the wizard, click on the ">" button on the GridView1 control.

To bind the data to the GridView control via the wizard

3.In the "Choose Data Source:" drop down list, select "SqlDataSource1"

"Choose Data Source:" drop down list

Accept the default settings, then click on anywhere in on the page outside of the "GridView Tasks" wizard.

4.  Save the .aspx page, and then press F5 to run the web application.  The GridView control will display the data in the browser.

GridView control will display the data in the browser

Once again the SqlDataSource control is meant for beginners, and in situations where you need something quick and you can throwaway.  Such as a proof of concept in a client meeting, with Entity Framework and LINQ around, SqlDataSource is really not suitable for a full blown application anymore.

Source Code: SqlDataSourceWS.zip, click on "File" -> "Download" to download the .zip file


Monday, July 8, 2013

HTML5 Page Template

This is the bare minimum you need to write a HTML5 page:
<!DOCTYPE html>
<html>
<head>
<title></title>
</head>
<body>
</body>
</html>
A little bit fancier, you want to specify the language and character set:
<!DOCTYPE html>
<html lang="en">
<head>
<meta charset="utf-8" />
<title></title>
</head>
<body>

</body>
</html>

HTML5 Tags


Not Supported in HTML5:
  • <tt>
  • <strike>
  • <noframes>
  • <frame>
  • <frameset>
  • <dir>
  • <center>
  • <big>
  • <basefont>
  • <applet>
  • <acronym>


DOCTYPE tag:

  • HTML5:
    <!DOCTYPE html>

  • HTML 4:
    <!DOCTYPE HTML PUBLIC "-//W3C//DTD HTML 4.01//EN" "http://www.w3.org/TR/html4/strict.dtd">
  • XHTML Strict:
    <!DOCTYPE html PUBLIC "-//W3C//DTD XHTML 1.0 Strict//EN" 
    "http://www.w3.org/TR/xhtml1/DTD/xhtml1-strict.dtd">
  • XHTML Traditional:
    <!DOCTYPE html PUBLIC "-//W3C//DTD XHTML 1.0 Transitional//EN" "http://www.w3.org/TR/xhtml1/DTD/xhtml1-transitional.dtd">


New HTML5 Tags:

Layout:
  • Top area of the page:
    <header>
  • Bottom area of the page:
    <footer>
  • Navigation links:
    <nav>
  • Line breaks:
    <wbr>


UI:
  • Progress bar, shows defined progress with flashing light:
    <progress>
  • Show result of a calculation:
    <output>
  • Meter (like a progress bar) but no flashing light:
    <meter>


Language:
  • Ruby annotation (East Asian typography):
    <ruby>
  • What to display if ruby annotation is not supported:
    <rp>
  • Definition/pronunciation of characters (East Asian typography):
    <rt>


Security:
  • Key pair generator, the public key is sent to the server:
    <keygen>


Data Type:
  • Date and Time:
    <time>


Event Handling:
  • Invokes a command for a button or html element, such as a Javascript function (only supported in IE9):
    <command>


External Application/Objects:
  • Embed external objects/content that sometimes requires a plugin such as Flash contents :
    <embed>


Media:
  • Sound content:
    <audio>
  • Video content:
    <video>
  • Subtitles for video or audio:
    <track>
  • List of sources(different media formats) for video or audio, the browser will play the supported video format:
    <sources>


Graphics:
  • Like a painting canvas that you can fill with graphics via scripting usually Javascript on the fly:
    <canvas>


Content:
  • Details the user can expand and collapse:
    <details>
    Details tag in Firefox Version 22.0:

    Details tag in IE 10.0.9200.16618:


    Details tag in Chrome Version 27.0.1453.116 m:

    Collapsed View In Chrome:


    Expanded View In Chrome:


  • Text next to the arrow in <details> tag:
    <summary>
  • Grouping of cotent, usually used in conjunction with <figcaption> to display an image with a caption:
    <figure>
  • Caption for &ltfigure&gt tag:
    <figcaption>
  • Format text in a different direction than adjacent text:
    <bdi>
  • Section of the page:
    <section>
  • A caption:
    <caption>
  • A content item:
    <article>
  • Related content item:
    <aside>
  • Highlight text:
    <mark>
  • Dialog box or window, a markup of conversions (not the dialog window more of like a transcript of a chat):
    <dialog>

Friday, July 5, 2013

Entity Framework Part 1: Generate an Entity Framework for the Northwind Database Tables

In my previous post we've created the Northwind products page using the SqlDataSource data control, even though there's nothing wrong with the solution.  SqlDataSource is a an old technology and is not meant to be an enterprise solution.  SqlDataSource is the stone age of .NET data access technology.  The future of .NET is the Entity Framework.

The goal of the Entity Framework is to create a conceptual model of your data store so that you can work with tables and rows as objects, or entities.  In essence the developer does not know or care what the data store is, he does not have to be a dba to work with the data.

To demonstrate the Entity Framework let's create the Northwind products page using the Entity Data Model of the Northwind database.

Here are the steps:

1. Open the Northwind project you created with the SqlDataSource
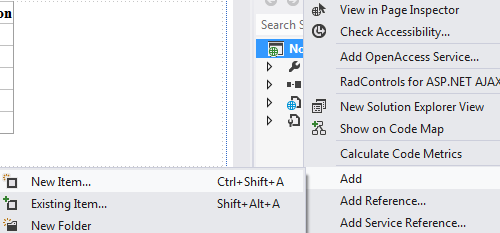
2. Righ-click on the Northwind project in "Solution Explorer", then select "Add", then "New Item"
Solution Explorer
3. Select "Data" under "Visual C#" in the "Add New Item" dialog box, then select "ADO.NET Entity Data Model"


4. In the "Choose Model Contents" dialog box, choose "Generate from database", then click "Next"

Generate from database


 5. On the "Choose Your Data Connection" dialog box, click on the "New Connection" button, then type in the name of your database server in the "Server name:" field and select the "Northwind" database in the "Connection Properties" dialog box.
Connection Properties

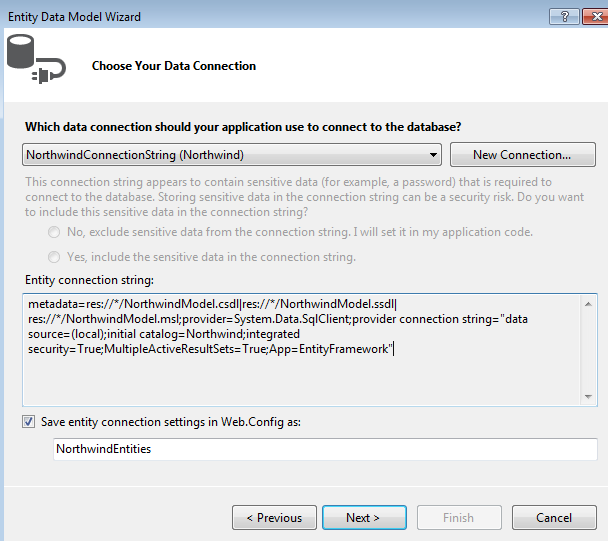
 6. Select the "Northwind" database connection, and save the Entity connection as "NorthwindEntities", then click "Next"

Entity Data Model Wizard
 7. Choose all of the database tables in the "Choose Your Database Objects and Settings" dialog box, leave the "Model Namespace", then click "Finish".  Entity Framework for the "Northwind" database model will be generated for you in Visual Studio.

Northwind database model


 8. In "Solution Explorer" there is also a "NorthwindModel.edmx" file that contains the Entity and data store mappings in raw XML.

9. Now to query the Northwind model you need to use LINQ, create a new Web Form and call it Products.aspx

10. Add a GridView to the design surface

11. Open the code-behind page Products.aspx.cs then in the Page_Load method type in the following
        

       protected void Page_Load(object sender, EventArgs e)
        {
            NorthwindEntities nEntitites = new NorthwindEntities();

            var products = nEntitites.Products;

            GridView1.DataSource = products;
            GridView1.DataBind();

        }

        In the code above you instantiate a new NorthwindEntities model, then assign the Products collection into the variable products.  The Products entity contains a collection of the Product object, it's like querying the Products table but you are working directly with the object created by the Entity Framework instead querying the database directly.

12.  To run the application press F5, you will see that the GridView control has been populated with data

GridView

Source Code: Northwind.zip, click "File" -> "Download" to download the source code in .zip format.