Wednesday, April 22, 2015

Blogger: Add Google Translate To Your Blog

Being a Google product, Blogger integrates nicely with the Google family of services.  One the more useful tools at your disposal is the Google Translate gadget that comes out of the box with a Blogger blog.  In this blog we will go over how to add a Google Translate gadget to your blog's sidebar.

Step-By-Step Instructions:

1.  Log into your blog, and click on the "Layout" link in the left navigation


2.  In the Layout page click on the "Add a Gadget" link


3.  Locate the "Translate" gadget, then click on the + button.


4.  Accept the default settings in the "Configure Translate" page, then click "Save"


5.  The "Translate" gadget is now at the top of the sidebar gadgets


6.  Click on the "Save arrangement" button on right hand corner to save the layout changes


7. Click on the "View blog" button on the left hand corner to see your changes on the blog


8. You will see the "Translate" gadget on the right sidebar now.


Blogger: Adding Adsense Ads To Blogger


Let's face it, most of us starts blogging so that we can can hopefully retire in the Caribbean using money that we make from our blog.  Well to do that we need ads on our blog.  In this blog post we will go over the steps to associate, and setup Adsense ads on your Blogger blog.

Step-By-Step Instructions:

1. Log into your Blogger Blog account, then click on Earnings → AdSense


2.  Click "Sign up for AdSense"


3.  A warning message will appear, saying you are signed as your Blogger Google account.  If your AdSense account is different than your Blogger account then click on "Use a different or new Google Account", else click on the "Yes, use ......." button if your Blogger account and AdSense account are the same.


4.  Click on "Yes, proceed to Google Account sign in" to sign into your Adsense account.


5.  Sign into your AdSense account

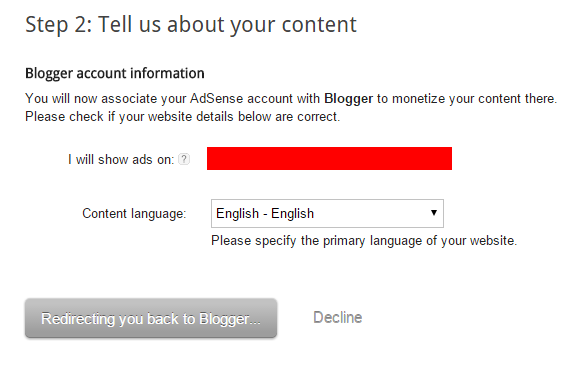
6. After signing in you will be taken to "Step 2: Tell us about your content" screen.  Click the "Accept Association" button.  This will associate your Blogger blog with your AdSense account.


7.   The button will turn to "Redirecting you back to Blogger", let the page redirect back to Blogger.  Do not close your browser.


8.  If your account is different you'll be asked to sign into your Blogger account.  So log into your Blogger blog again to complete the proccess.


9. Once in your Blogger blog if you click on Earnings → AdSense again you will see that your AdSense account is now associated with the Blogger blog


Tuesday, April 21, 2015

Blogger: Adding Adsense Ads To Blogger

Let's face it, most of us starts blogging so that we can can hopefully retire in the Caribbean using money that we make from our blog.  Well to do that we need ads on our blog.  In this blog post we will go over the steps to associate, and setup Adsense ads on your Blogger blog.

Step-By-Step Instructions:

1. Log into your Blogger Blog account, then click on Earnings → AdSense


2.  Click "Sign up for AdSense"


3.  A warning message will appear, saying you are signed as your Blogger Google account.  If your AdSense account is different than your Blogger account then click on "Use a different or new Google Account", else click on the "Yes, use ......." button if your Blogger account and AdSense account are the same.


4.  Click on "Yes, proceed to Google Account sign in" to sign into your Adsense account.


5.  Sign into your AdSense account

6. After signing in you will be taken to "Step 2: Tell us about your content" screen.  Click the "Accept Association" button.  This will associate your Blogger blog with your AdSense account.


7.   The button will turn to "Redirecting you back to Blogger", let the page redirect back to Blogger.  Do not close your browser.


8.  If your account is different you'll be asked to sign into your Blogger account.  So log into your Blogger blog again to complete the proccess.


9. Once in your Blogger blog if you click on Earnings → AdSense again you will see that your AdSense account is now associated with the Blogger blog


Monday, April 20, 2015

Blogger : Import Blog Posts From Another Blogger Blog


In the previous blog we've exported a blog from Blogger.  In this blog we will import the .xml file that we've exported from that blog.

Step By Step Instructions:

1.  Sign into the blog the you want to import your blog posts to

2. Under the "Settings" section click on the "Other"


3.  Click on the "Import blog" link


4. Click on the "Choose File" button


5.  Select the .xml export file


6.  Check the "I'm not a robot" checkbox, then click "Import Blog" button.


7.  The blogs from another blog will show up on the designated blog


You can view the imported blog posts at http://techjunkiesandbox.blogspot.com


Sunday, April 19, 2015

Blogger : Import Blog Posts From Another Blogger Blog

In the previous blog we've exported a blog from Blogger.  In this blog we will import the .xml file that we've exported from that blog.

Step By Step Instructions:

1.  Sign into the blog the you want to import your blog posts to

2. Under the "Settings" section click on the "Other"


3.  Click on the "Import blog" link


4. Click on the "Choose File" button


5.  Select the .xml export file


6.  Check the "I'm not a robot" checkbox, then click "Import Blog" button.


7.  The blogs from another blog will show up on the designated blog


Blogger : Export Blog Posts From Blogger Blog

In this blog we will go over how to export your blogs in Google's Blogger blogging application.

Step-By-Step Instructions Exporting Your Blog:

1. Sign into the blog you want to export your blog posts from.

2.  Select "Other" in the "Settings" section


3.  In the "Blog Tools" section select "Export blog"


4.  In the pop up dialog box click on the "Download Blog" button


5. Save the .xml file that Blogger generates, by clicking on the "Save" button.


6.  Your blog has now been exported to an xml file


7.  Click "Close" on the "Export Blog" pop up window


Blogger : Export Blog Posts From Blogger Blog


In this blog we will go over how to export your blogs in Google's Blogger blogging application.

Step-By-Step Instructions Exporting Your Blog:

1. Sign into the blog you want to export your blog posts from.

2.  Select "Other" in the "Settings" section


3.  In the "Blog Tools" section select "Export blog"


4.  In the pop up dialog box click on the "Download Blog" button


5. Save the .xml file that Blogger generates, by clicking on the "Save" button.


6.  Your blog has now been exported to an xml file


7.  Click "Close" on the "Export Blog" pop up window


Saturday, April 18, 2015

Blogger: Create A New Blog In Blogger


Creating a new blog in Blogger is really easy in fact it takes less than five minutes to do.  Well maybe ten minutes if you have to take screen shots.  Below is a step by step process of how to create your new Blogger blog.

Step-By-Step:

1.  Log into blogger.com with your Google account, you will be logged into the Blogger dashboard

2.  In the dashboard there will be button that says "New Blog", click on the button


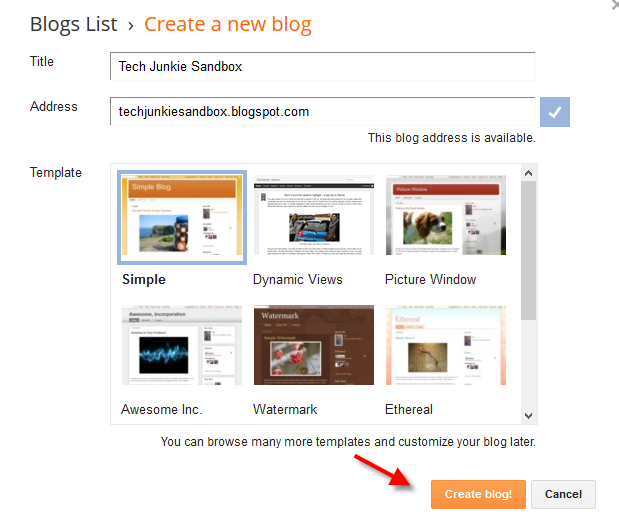
3.  The "Create  a new blog" window will appear, type in the "Title" and the "Address" for your blog as you type the address blogger will show you what the final URL will look like.


4.  Choose a template for your blog, and then click on the "Create blog!" button.


5.  Your new blog will be created in your dashboard.


6.  Type in the browser URL bar your new blog's URL in this case it's techjunkiesandbox.blogspot.com

You can visit the finish new blog at techjunkiesandbox.blogspot.com