Showing posts with label JQuery. Show all posts

Wednesday, July 13, 2016

ASP.NET Core : Add jQuery, Bootstrap, AngularJS Using bower.json

In this blog post we are going to add the jQuery, AngularJS, and bootstrap libraries to our ASP.NET Core application.  Normally we will use NuGet to bring in these libraries but ASP.NET Core gives you the option to use bower to configure the dependencies that you will need on the client-side.

Here are the steps to import the client-side dependencies into our project:

1. First let's make bower.json part of the "NorthwindCafe.Web" project, by right click on the bower.json file, and then choose "Show in Solution Explorer"

2.  Open the bower.json file the markup should look like this

{
"name": "asp.net",
"private": true,
"dependencies": {
}
}

3. Change the markup to look like the following
{
"name": "asp.net",
"private": true,
"dependencies": {
"bootstrap": "~3.3.6",
"angular": "~1.5.7"
}
}

4. Save the bower.json file, once the file is saved a folder called "lib" will be created and will contain the bootstrap and AngularJS libraries


ASP.NET Core Posts:
  1. How To Create An ASP.NET Core Application From Scratch
  2. ASP.NET Core : Add jQuery, Bootstrap, AngularJS Using bower.json
  3. Enable ASP.NET Core to Serve Static Files
  4. Enable MVC On ASP.NET Core Application


Saturday, June 18, 2016

ASP.NET MVC 5 From Scratch : Adding BundleConfig

In our previous blog we've added a _ViewStart.cshtml layout to our project, which is the default layout for our pages if no layout is specified for the page.  In this blog we will add BundleConfig for the JavaScript libraries which includes JQuery, and Bootstrap that we've added to our MvcApp project in the previous blogs.  A configuration bundle allows you to group files that belongs in the same libraries together so that they can called with just one line of code.  In this blog we will be creating configuration bundles for JQuery, and Bootstrap to the MvcApp project.

Step-By-Step Instructions:

1.  Right-click on the folder "App_Start", then select Add → New Item → Visual C# → Class, name the class BundleConfig.cs


2.  Now the App_Start folder should look like the screenshot below


3.  Open the BundleConfig.cs file, then delete the existing using statements, and then add the following namespaces

using System.Web;
using System.Web.Optimization;

4. The resulting code should look like the following up to this point
using System.Web;
using System.Web.Optimization;

namespace MvcApp.App_Start
{
public class BundleConfig
{
}
}

5. If you see the System.Web.Optimization with the red underline, that means you have the reference to your project


6.  To add the reference open the NuGet Package Manager Console by selecting Tools → NuGet Package Manager →  Package Manager Console


7.  Once the Package Manager Console has been opened type in the following command Install-Package Microsoft.AspNet.Web.Optimization, then press "Enter"


8.  Once the package has been add you should get the following message "Successfully added 'Microsoft.AspNet.Web.Optimization 1.1.3' to MvcApp."

10.  Now the red underline is gone from the BundleConfig.cs file


11. Inside the BundleConfig class add a static method call RegisterBundles with a BundleCollection call bundles parameter.  So the code should look like the following

using System.Web;
using System.Web.Optimization;

namespace MvcApp.App_Start
{
public class BundleConfig
{
public static void RegisterBundles(BundleCollection bundles)
{
}
}
}

The code above tells MVC to register the bundles in the static method RegisterBundles

12. First lets create a bundle for the JQuery library by adding the following lines of code to the RegisterBundles method
            bundles.Add(new ScriptBundle("~/bundles/jquery").Include(
"~/Scripts/jquery-{version}.js"));

The code above tells MVC to include all the files in the "Scripts" folder that has the string "jquery" in the file followed by a "-" and version number with the file extension ".js". Also give it the reference of "~/bundles/jquery", this is how we are going to reference the bundle in our views later on.

13. Now we are going to add the add the Boostrap library to the project in a similar fashion.
            bundles.Add(new ScriptBundle("~/bundles/bootstrap").Include(
"~/Scripts/bootstrap.js",
"~/Scripts/respond.js"));

bundles.Add(new StyleBundle("~/Content/css").Include(
"~/Content/bootstrap.css"));

The code above tells MVC to reference the bootstrap script bundle as "~/bundles/bootstrap" and the include the files "bootstrap.js" and "respond.js" in the "Scripts" folder. Likewise reference the css files for bootstrap as "~/Content/css" and include the files "bootstrap.css" and "site.css" in the "Content" folder. The css bundle is a catch all bundle where all the css files in the first level of the Content folder will be referenced.

The final code for the BundleConfig class should look like this

using System.Web;
using System.Web.Optimization;

namespace MvcApp.App_Start
{
public class BundleConfig
{
public static void RegisterBundles(BundleCollection bundles)
{
bundles.Add(new ScriptBundle("~/bundles/jquery").Include(
"~/Scripts/jquery-{version}.js"));

bundles.Add(new ScriptBundle("~/bundles/bootstrap").Include(
"~/Scripts/bootstrap.js",
"~/Scripts/respond.js"));

bundles.Add(new StyleBundle("~/Content/css").Include(
"~/Content/bootstrap.css"));
}
}
}

14. Now it's time to add the bundle configurations to our _Layout.csthml view.

15.  Open the _Layout.cshtml file under Views → Shared folder

16.  First we will add the css bundle, by typing in the following code in the head section
 @Styles.Render("~/Content/css")

17. Now scroll to the bottom of the page and add the JavaScript bundles to the layout page
    @Scripts.Render("~/bundles/jquery")
@Scripts.Render("~/bundles/bootstrap")

The completed layout code should look like the following
<!DOCTYPE html>
<html>
<head>
<title>@Page.Title</title>
@RenderSection("head", required: false)
@Styles.Render("~/Content/css")
</head>
<body>
<h1>This is from the _ViewStart.cshtml</h1>
@RenderBody()
@Scripts.Render("~/bundles/jquery")
@Scripts.Render("~/bundles/bootstrap")
</body>
</html>

If Visual Studio is complaining about the "@Scripts" and "@Styles" reference is missing then add the System.Web.Optimization to the Views web.config file.


18.  Open the web.config file under the folder Views and add the following code
<add namespace="System.Web.Optimization">
</add>

Inside the <namespaces> tag
Here is how the web.config file should look like

  <system .web.webpages.razor="">
<host factorytype="System.Web.Mvc.MvcWebRazorHostFactory, System.Web.Mvc, Version=5.2.2.0, Culture=neutral, PublicKeyToken=31BF3856AD364E35">
<pages pagebasetype="System.Web.Mvc.WebViewPage">
<namespaces>
<add namespace="System.Web.Mvc">
<add namespace="System.Web.Mvc.Ajax">
<add namespace="System.Web.Mvc.Html">
<add namespace="System.Web.Optimization">
<add namespace="System.Web.Routing">
<add namespace="WebApplication1">
</add></add></add></add></add></add></namespaces>
</pages>
</host></system>

If you build the MvcApp project the missing reference error will disappear for the @Scripts and @Styles namespaces.

 19. Press Ctrl+F5 to run the application, you will get the following error message

Server Error in '/' Application.
Could not load file or assembly 'Newtonsoft.Json' or one of its dependencies. The located assembly's manifest definition does not match the assembly reference.

20.  To get rid of the error you have to open the web.config file under the application's root folder and delete the following lines

      
<assemblyidentity culture="neutral" name="Newtonsoft.Json" publickeytoken="30ad4fe6b2a6aeed">
<bindingredirect newversion="6.0.0.0" oldversion="0.0.0.0-6.0.0.0">
</bindingredirect></assemblyidentity></dependentassembly>

21. Now open the NuGet Package Manager Console and type in the following update-package Newtonsoft.Json -reinstall, then press enter

22. When the package Newtonsoft.Json is reinstalled again you will get the following message "Successfully added 'Newtonsoft.Json 5.0.4' to MvcApp."

23.  There is one more thing that you have to do to make the bundle configs work, you have to register the bundles at the Application_Start() method in the Global.asax.cs file.

24. Open the Global.asax.cs add the following line at the end of the Application_Start() method

BundleConfig.RegisterBundles(BundleTable.Bundles);

Your Global.asax.cs file should look like the following at this point
using System;
using System.Collections.Generic;
using System.Linq;
using System.Web;
using System.Web.Mvc;
using System.Web.Optimization;
using System.Web.Routing;

namespace MvcApp
{
public class MvcApplication : System.Web.HttpApplication
{
protected void Application_Start()
{
AreaRegistration.RegisterAllAreas();
RouteConfig.RegisterRoutes(RouteTable.Routes);
BundleConfig.RegisterBundles(BundleTable.Bundles);
}
}
}


25. Now run the application again by pressing Ctrl + F5 and you should see the following


26.  If you look at the source code you will see that JQuery and Bootstrap files have been added to the View that is displayed on the browser

<!DOCTYPE html>
<html>
<head>
<title></title>

<link href="/Content/bootstrap.css" rel="stylesheet"/>

</head>
<body>
<h1>This is from the _ViewStart.cshtml</h1>


<h3>This is from Index.cshtml</h3>
<script src="/Scripts/jquery-2.1.4.js"></script>

<script src="/Scripts/bootstrap.js"></script>


ASP.NET MVC 5 From Scratch : Add JQuery Library Using NuGet

In the previous blog we've created an empty ASP.NET MVC 5 project.  It's a great starting point but, it's missing a lot things that we will need later.  In this blog we will add JQuery to the empty ASP.NET MVC 5 project that we've just created.

Step-By-Step Instructions:

1. Open the empty ASP.NET MVC 5 project that you've just created

2.  Right click on the the "References" node in the "Solution Explorer", then select "Manage NuGet Packages"


3. In the search box on the right of NuGet window type "JQuery", the search result will be displayed


4. Click on the "Install" button next to the JQuery result, it should be at the top of the list


5. Once the JQuery library has been installed a green check mark is displayed, click on the "Close" button


6.  Now you should see the JQuery scripts in the "Scripts" folder


7.  To use the JQuery .js script reference the jquery-2.14.min.js file with the following code between the <head> element
<script src="~/Scripts/jquery-2.1.4.min.js"></script>

8. You can use the following code to test if JQuery is working in your ASP.NET MVC project
    <script>
$(document).ready(alert("jquery is working"));
</script>

9. So you can modify the "Index.cshtml" to have the following markup to test if JQuery is working or not, if JQuery is working you should get an alert box saying "jquery is working"
@{
Layout = null;
}

<!DOCTYPE html>

<html>
<head>
<meta name="viewport" content="width=device-width" />
<title>Index</title>
<script src="~/Scripts/jquery-2.1.4.min.js"></script>
</head>
<body>
<div>
Hello World!
</div>
<script>
$(document).ready(alert("jquery is working"));
</script>

</body>
</html>


ASP.NET MVC 5 From Scratch : Add JQuery UI Library Using NuGet

In the previous blog we've added the Bootstrap library to our empty ASP.NET MVC project.  Now let's add another commonly used JQuery library to our project.  In this blog we will add the JQuery UI library to our empty project.

Step-By-Step Instructions:

1. Open the empty ASP.NET MVC 5 project that you've just created

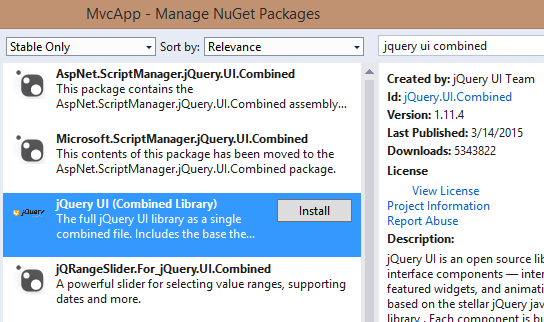
2.  Right click on the the "References" node in the "Solution Explorer", then select "Manage NuGet Packages"


3.  In the search box on the right of NuGet window type "jquery ui combined", the search result will be displayed, the package that you want to install is highlighted below.  Notice it's the third choice which is called the jQuery UI (Combined Library)


4.  Click on the "Install" button next to the "jQuery UI (Combined Library)" package.


5.  Once the JQuery UI library has been installed a green check mark is displayed, click on the "Close" button


6.  Now you should see the JQuery UI scripts in the "Scripts" folder


ASP.NET MVC 5 From Scratch : Add Bootstrap Library Using NuGet

In the previous blog we've created added the JQuery library to an empty ASP.NET MVC 5 project. In this blog we will add the Bootstrap to the empty ASP.NET MVC 5 project that we've just created.

Step by Step Instructions:

1. Open the empty ASP.NET MVC 5 project that you've just created

2.  Right click on the the "References" node in the "Solution Explorer", then select "Manage NuGet Packages"


3.  In the search box on the right of NuGet window type "bootstrap", the search result will be displayed

4. Click on the "Install" button next to the "Bootstrap" result, it should be at the top of the list

5.  Once the Bootstrap library has been installed a green check mark is displayed, click on the "Close" button

6.  Now you should see the Bootstrap scripts in the "Scripts" folder

7.  You will also noticed that the "Contents" folder has been created, this folder was created when NuGet installed the Bootstrap library in the "MvcApp" project. This folder contains the cascading stylesheet that Bootstrap uses


8.  Now let's test our bootstrap installation, in the "Index.cshtml" type in the following markup

@{
Layout = null;
}

<!DOCTYPE html>

<html>
<head>
<meta name="viewport" content="width=device-width" />
<title>Index</title>
<link href="~/Content/bootstrap.min.css" rel="stylesheet" />
<script src="~/Scripts/jquery-2.1.4.min.js"></script>
<script src="~/Scripts/bootstrap.min.js"></script>
</head>
<body>
<div class="jumbotron">
Hello Bootstrap!
<p><a class="btn btn-primary btn-lg" href="#" role="button">Installed</a></p>
</div>

</body>
</html>

9. When you press Ctrl+F5 to run the application you should see the following in your browser

ASP.NET MVC 5 From Scratch : Configure The BundleConfig Class To Use CDN

A lot of developers assumed that they can only configure the BundleConfig class to use only local resources in their MVC project.  That is not the case, in fact it is quite easy to use a cdn version of your JavaScript libraries instead of the one in your local folder.  In the previous blog we went over how to create the BundleConfig class from scratch.  In this blog we will go over how to configure MVC to use the cdn resource instead of your local resource files.

Step-By-Step Instructions:

1.  Open the MvcApp project
2.  Open the BundleConfig.cs file under the folder App_Start


3.  From the last blog we have the following code

using System.Web;
using System.Web.Optimization;

namespace MvcApp
{
public class BundleConfig
{
public static void RegisterBundles(BundleCollection bundles)
{
bundles.Add(new ScriptBundle("~/bundles/jquery").Include("~/Scripts/jquery-{version}.js"));

bundles.Add(new ScriptBundle("~/bundles/bootstrap").Include("~/Scripts/bootstrap.js","~/Scripts/respond.js"));

bundles.Add(new StyleBundle("~/Content/css").Include("~/Content/bootstrap.css"));
}
}
}

4.  Now let's change the code so that our MVC project uses the CDN location instead of the local virtual path library instead.  Change the code to the following.

using System.Web;
using System.Web.Optimization;

namespace MvcApp
{
public class BundleConfig
{
public static void RegisterBundles(BundleCollection bundles)
{
bundles.Add(new ScriptBundle("~/bundles/jquery", "https://ajax.googleapis.com/ajax/libs/jquery/2.1.4/jquery.min.js").Include("~/Scripts/jquery-{version}.js"));

bundles.Add(new ScriptBundle("~/bundles/bootstrap","https://maxcdn.bootstrapcdn.com/bootstrap/3.3.4/js/bootstrap.min.js").Include("~/Scripts/bootstrap.js","~/Scripts/respond.js"));

bundles.Add(new StyleBundle("~/Content/css", "https://maxcdn.bootstrapcdn.com/bootstrap/3.3.4/css/bootstrap.min.css").Include("~/Content/bootstrap.css"));

BundleTable.EnableOptimizations = true;
bundles.UseCdn = true;
}
}
}

What a lot of developers don't realized is that there is an overload for class constructor of ScriptBundle and StyleBundle, which takes two string parameters, for example for the ScriptBundle it would be ScriptBundle(string, string) and for the StyleBundle it would be StyleBundle(string, string).  The first parameter is the virtual path and the second parameter is the cdnPath.  We might be asking yourself, if it takes two parameters, how does MVC know which one to use?  Well, the cdn location is used only when the BundleTable.EnableOptimizations property is set to true.  Setting the EnableOptimization property to true tells MVC to use the use the minified version of the file instead of the regular version.  When this property is set to true, and the cdn path is present MVC will use the cdn path instead of the local virtual path.  There is one more property you have to set to true and that is the bundles.UseCdn.  This tells MVC to use the cdn location instead of the local version.  If the BundleTable.EnableOptimization is set to false, then the local version is used automatically as a fall back because the cdn version is the minified version.

5.  Now you run the MvcApp application by click Crt+F5 and look in the source code you will see that page uses the cdn path instead of the local virtual path.

<!DOCTYPE html>
<html>
<head>
<title></title>

<link href="https://maxcdn.bootstrapcdn.com/bootstrap/3.3.4/css/bootstrap.min.css" rel="stylesheet"/>

</head>
<body>
<h1>This is from the _ViewStart.cshtml</h1>


<h3>This is from Index.cshtml</h3>
<script src="https://ajax.googleapis.com/ajax/libs/jquery/2.1.4/jquery.min.js"></script>

<script src="https://maxcdn.bootstrapcdn.com/bootstrap/3.3.4/js/bootstrap.min.js"></script>


Monday, June 8, 2015

ASP.NET MVC 5 From Scratch : Using Conditional Comments to Support Older Versions Of IE

Older versions of IE have problems supporting the newer JavaScript libraries and HTML5 tags.  In the previous blog we've created responsive layout in ASP.NET MVC.  In this blog we are going to use conditional comments to support older versions of Internet Explorer (IE).  Since IE 9 seems to be the cutoff point we will use it in our conditional comment base condition to decide whether we want to do something different to support IE.  We will be working with the MvcApp project.

Step-By-Step Instructions:

1.  Open the MvcApp application
2.  Open the _Layout.cshtml
3.  Inside the <head> tag

    <!--[if lt IE 9]>
<script src="https://oss.maxcdn.com/html5shiv/3.7.2/html5shiv.min.js"></script>
<script src="https://oss.maxcdn.com/respond/1.4.2/respond.min.js"></script>
<script src="http://ajax.googleapis.com/ajax/libs/jquery/1.11.2/jquery.min.js"></script>
<![endif]-->

The code above says to include the html5shiv.min.js and response.min.js from maxcdn.com if the browser's version is less than IE 9 with the line <!--[if lt IE 9]>. The html5shiv library supports HTML5 elements in IE and the response library supports media queries in IE. Inside the "if" condition it also tells the layout to use JQuery 1.xxx versions for IE.

The complete code should look like the following in the _Layout.cshtml
<!DOCTYPE html>
<html>
<head>
<meta name="viewport" content="width=device-width, initial-scale=1">
<title>@Page.Title</title>
@RenderSection("head", required: false)
@Styles.Render("~/Content/bootstrap")
@Styles.Render("~/Content/css")
<!--[if lt IE 9]>
<script src="https://oss.maxcdn.com/html5shiv/3.7.2/html5shiv.min.js"></script>
<script src="https://oss.maxcdn.com/respond/1.4.2/respond.min.js"></script>
<script src="http://ajax.googleapis.com/ajax/libs/jquery/1.11.2/jquery.min.js"></script>
<![endif]-->

</head>
<body>
<header>
<nav class="navbar navbar-default navbar-fixed-top">
<div class="row">
<div class="navbar-header">
<button type="button" class="navbar-toggle collapsed" data-toggle="collapse" data-target="#navbar" aria-expanded="false" aria-controls="navbar">
<span class="sr-only">Toggle navigation</span>
<span class="icon-bar"></span>
</button>
<a class="navbar-brand" href="#"></a>
</div>
<div id="navbar" class="navbar-collapse collapse">
<ul class="nav navbar-nav">
<li class="active"><a href="#">Home</a></li>
<li><a href="#about">About</a></li>
<li><a href="#contact">Contact</a></li>
<li class="dropdown">
<a href="#" class="dropdown-toggle" data-toggle="dropdown" role="button" aria-expanded="false">Products <span class="caret"></span></a>
<ul class="dropdown-menu" role="menu">
<li><a href="#">Beverages</a></li>
<li><a href="#">Condiments</a></li>
<li><a href="#">Confections</a></li>
<li><a href="#">Dairy Products</a></li>
<li><a href="#">Grains/Cereals</a></li>
<li><a href="#">Meat/Poultry</a></li>
<li><a href="#">Produce</a></li>
<li><a href="#">Seafood</a></li>
</ul>
</li>
</ul>
</div><!--/.nav-collapse -->
</div>

</div>
</nav>
<div class="jumbotron" id="header-jumbotron">
<h2>Northwind Store</h2>
</div>
</header>
@RenderBody()
@Scripts.Render("~/bundles/jquery")
@Scripts.Render("~/bundles/bootstrap")
</body>
</html>

← Previous  
Create A Responsive Layout With Bootstrap

Thursday, June 4, 2015

ASP.NET MVC 5 From Scratch : Create A Responsive Layout With Bootstrap

In our previous blog we created a simple _Layout.cshtml file that does not have any markup just to make things simple.  In this blog we will use Bootstrap to make the layout look more professional and responsive, so that it can be viewed in any screen size.  The previous layout looks like screenshot below.


The Bootstrap version will look like the screenshot below.


Step-By-Step Instructions:

1.  Open the MvcApp project
2. Open the BundleConfig.cs file in the App_Start folder and type in the following code

using System.Web;
using System.Web.Optimization;

namespace MvcApp
{
public class BundleConfig
{
public static void RegisterBundles(BundleCollection bundles)
{
bundles.Add(new ScriptBundle("~/bundles/jquery", "https://ajax.googleapis.com/ajax/libs/jquery/
2.1.4/jquery.min.js").Include("~/Scripts/jquery-{version}.js"));
            bundles.Add(new ScriptBundle("~/bundles/bootstrap","https://maxcdn.bootstrapcdn.com/bootstrap/
3.3.4/js/bootstrap.min.js").Include("~/Scripts/bootstrap.js","~/Scripts/respond.js"));

bundles.Add(new StyleBundle("~/Content/bootstrap", "https://maxcdn.bootstrapcdn.com/bootstrap/
3.3.4/css/bootstrap.min.css").Include("~/Content/bootstrap.css"));

bundles.Add(new StyleBundle("~/Content/css").Include("~/Content/Styles.css"));

BundleTable.EnableOptimizations = true;
bundles.UseCdn = true;
}
}
}

The code above creates a new StyleBundle with the virtual path ~/Content/bootstrap, which is created specifically for the bootstrap css files. Then we change the StyleBundle("~/Content/css") bundle to contain stylesheets that are site specific. We will add the Styles.css file later

 3.  Now we are ready to add the header navigation to the _Layout.cshtml file, which is the layout specified as the default layout in the _ViewStart.cshtml file.

4.  Open the _Layout.cshtml file, then type in the following code

<!DOCTYPE html>
<html>
<head>
<meta name="viewport" content="width=device-width, initial-scale=1">
<title>@Page.Title</title>
@RenderSection("head", required: false)
@Styles.Render("~/Content/bootstrap")
@Styles.Render("~/Content/css")
</head>

The code above defines the viewpoint as the device-width, a viewport is the width of the screen used to determine how bootstrap will display the elements on the screen. The device-width viewport means that the elements will be render to the screen's device width. The rest of the code just renders all the style bundles that we've defined in the BundleConfig.cs file.

5.  Once we have the head section defined we can define the header section of the layout.

    <body>
<header>
<nav class="navbar navbar-default navbar-fixed-top">
<div class="row">
<div class="navbar-header">
<button type="button" class="navbar-toggle collapsed" data-toggle="collapse" data-target="#navbar" aria-expanded="false" aria-controls="navbar">
<span class="sr-only">Toggle navigation</span>
<span class="icon-bar"></span>
</button>
<a class="navbar-brand" href="#"></a>
</div>
<div id="navbar" class="navbar-collapse collapse">
<ul class="nav navbar-nav">
<li class="active"><a href="#">Home</a></li>
<li><a href="#about">About</a></li>
<li><a href="#contact">Contact</a></li>
<li class="dropdown">
<a href="#" class="dropdown-toggle" data-toggle="dropdown" role="button" aria-expanded="false">Products <span class="caret"></span></a>
<ul class="dropdown-menu" role="menu">
<li><a href="#">Beverages</a></li>
<li><a href="#">Condiments</a></li>
<li><a href="#">Confections</a></li>
<li><a href="#">Dairy Products</a></li>
<li><a href="#">Grains/Cereals</a></li>
<li><a href="#">Meat/Poultry</a></li>
<li><a href="#">Produce</a></li>
<li><a href="#">Seafood</a></li>
</ul>
</li>
</ul>
</div><!--/.nav-collapse -->
</div>

</div>
</nav>
<div class="jumbotron" id="header-jumbotron">
<h2>Northwind Store</h2>
</div>
</header>

The code above looks complicated, but it's not that complicated. First we use the bootstrap class "navbar navbar-default navbar-fixed-top" to tell the browser that we want the navbar that fixes on the top of the screen even when the user scrolls. All we have to do is define the class and bootstrap does the rest for us.  The navbar class defines the top navigation of the layout like the screenshot below


6.  The following section defines the menu when the screen gets really small and the elements have to be stacked because it does not have the width to display everything horizontally.

                            <div class="navbar-header">
<button type="button" class="navbar-toggle collapsed" data-toggle="collapse" data-target="#navbar" aria-expanded="false" aria-controls="navbar">
<span class="sr-only">Toggle navigation</span>
<span class="icon-bar"></span>
</button>
<a class="navbar-brand" href="#"></a>
</div>

The menu looks like the following when the screen gets really small


7.  Now we want to define the actual navigation bar, type in the following code to define the "Home", "About","Contact" tabs, and the "Products" drop down.


                            <div id="navbar" class="navbar-collapse collapse">
<ul class="nav navbar-nav">
<li class="active"><a href="#">Home</a></li>
<li><a href="#about">About</a></li>
<li><a href="#contact">Contact</a></li>
<li class="dropdown">
<a href="#" class="dropdown-toggle" data-toggle="dropdown" role="button" aria-expanded="false">Products <span class="caret"></span></a>
<ul class="dropdown-menu" role="menu">
<li><a href="#">Beverages</a></li>
<li><a href="#">Condiments</a></li>
<li><a href="#">Confections</a></li>
<li><a href="#">Dairy Products</a></li>
<li><a href="#">Grains/Cereals</a></li>
<li><a href="#">Meat/Poultry</a></li>
<li><a href="#">Produce</a></li>
<li><a href="#">Seafood</a></li>
</ul>
</li>
</ul>
</div><!--/.nav-collapse -->

Like everything else in bootstrap we just have to call class "navbar-collapse collapse" and nest the div with the <ul> element with class "nav navbar-nav" and bootstrap picks it up applies the stylesheets and functionalities automatically. That's the great thing about bootstrap. It makes things easy, but the bad thing is a lot of the sites nowadays have the same bootstrapy look and feel to them. But it's great if you want to throw something together quickly and make it look decent.

So the code below defines the "Home", "About", and "Contact" tab

    <li class="active"><a href="#">Home</a></li>
<li><a href="#about">About</a></li>
<li><a href="#contact">Contact</a

And the following code defines the "Products" dropdown menu.
                                    <li class="dropdown">
<a href="#" class="dropdown-toggle" data-toggle="dropdown" role="button" aria-expanded="false">Products <span class="caret"></span></a>
<ul class="dropdown-menu" role="menu">
<li><a href="#">Beverages</a></li>
<li><a href="#">Condiments</a></li>
<li><a href="#">Confections</a></li>
<li><a href="#">Dairy Products</a></li>
<li><a href="#">Grains/Cereals</a></li>
<li><a href="#">Meat/Poultry</a></li>
<li><a href="#">Produce</a></li>
<li><a href="#">Seafood</a></li>
</ul>
</li>


8. Now we want to add a jumbotron to make the navigation stand out a little bit.

           <div class="jumbotron" id="header-jumbotron">
<h2>Northwind Store</h2>
</div>

The code above produces the following output


9.  To style the jumbotron we have to create our own stylesheet so that it does not interfere with the default bootstrap styles.  So create a new css file in the ~/Content folder and give it the name Styles.css.

10.  In the Styles.css file type the following code

body {
}

#header-jumbotron{
background-color: #6f5499;
}
#navbar {
margin-left: 50px;
}

#header-jumbotron h2{
margin-left: 40px;
color: #fff;
margin-top: 50px;
}


The code above defines the margin for the navbar and the jumbotron, it also set the text color and background color for the jumbotron.

11. Now we want to wrap things up by calling the script bundles at the bottom of the page

        @RenderBody()
@Scripts.Render("~/bundles/jquery")
@Scripts.Render("~/bundles/bootstrap")

12. The complete code for the _Layout.cshtml file is the following

<!DOCTYPE html>
<html>
<head>
<meta name="viewport" content="width=device-width, initial-scale=1">
<title>@Page.Title</title>
@RenderSection("head", required: false)
@Styles.Render("~/Content/bootstrap")
@Styles.Render("~/Content/css")
</head>
<body>
<header>
<nav class="navbar navbar-default navbar-fixed-top">
<div class="row">
<div class="navbar-header">
<button type="button" class="navbar-toggle collapsed" data-toggle="collapse" 
data-target="#navbar" aria-expanded="false" aria-controls="navbar">
                                    <span class="sr-only">Toggle navigation</span>
<span class="icon-bar"></span>
</button>
<a class="navbar-brand" href="#"></a>
</div>
<div id="navbar" class="navbar-collapse collapse">
<ul class="nav navbar-nav">
<li class="active"><a href="#">Home</a></li>
<li><a href="#about">About</a></li>
<li><a href="#contact">Contact</a></li>
<li class="dropdown">
<a href="#" class="dropdown-toggle" data-toggle="dropdown" role="button" aria-expanded="false">Products <span class="caret"></span></a>
<ul class="dropdown-menu" role="menu">
<li><a href="#">Beverages</a></li>
<li><a href="#">Condiments</a></li>
<li><a href="#">Confections</a></li>
<li><a href="#">Dairy Products</a></li>
<li><a href="#">Grains/Cereals</a></li>
<li><a href="#">Meat/Poultry</a></li>
<li><a href="#">Produce</a></li>
<li><a href="#">Seafood</a></li>
</ul>
</li>
</ul>
</div><!--/.nav-collapse -->
</div>

</div>
</nav>
<div class="jumbotron" id="header-jumbotron">
<h2>Northwind Store</h2>
</div>
</header>
@RenderBody()
@Scripts.Render("~/bundles/jquery")
@Scripts.Render("~/bundles/bootstrap")
</body>
</html>


Friday, May 29, 2015

JQuery : jQuery.noConflict(); Resolve the $ Conflict

The JQuery library by design uses only two global namespace so that it would not conflict with other JavaScript libraries.
  • $ - the dollar is used as a reference to JQuery namespace
    • Also used by Prototype library, YUI and mootools
  • jQuery - is also used to reference to jQuery namespace, this the more unique reference of the two options, but nobody really uses it
So what do you do if you wanted to use jQuey and Prototype on the same page?  Well jQuery can concede the $ sign to the other libraries with the code jQuery.noConflict() function

This sample code shows how jQuery gives up the $ sign to the JavaScript library Prototype


<!DOCTYPE html>
<head>
<meta charset="UTF-8">
<title>JQuery No Conflict</title>
<script src="http://ajax.googleapis.com/ajax/libs/prototype/1.7.2.0/prototype.js"></script>
<script src="http://ajax.googleapis.com/ajax/libs/jquery/1.11.1/jquery.min.js"></script>
<script type="text/javascript">
jQuery.noConflict();

jQuery(document).ready(function(){
alert("jQuery still works!");
});
</script>
</head>
<body>
</body>
</html>


Note: The thing you have to remember is that the $ is no longer referring to JQuery, it now belongs to Prototype, if you try to use Prototype and JQuery on the same page without using jQuery.noConflict(), you will get a broken page with Prototype complaining that the $ does not work. However the error is not very description as you can see below in Firefox console.  You will get the TypeError: element.dispatchEvent is not a function.


Even though we've resolved the conflict, we are now left with type jQuery instead of using the $ every time we want to use jQuery.  Well we can assign the object jQuery to another shorthand variable with the code below.


<!DOCTYPE html>
<head>
<meta charset="UTF-8">
<title>JQuery No Conflict</title>
<script src="http://ajax.googleapis.com/ajax/libs/prototype/1.7.2.0/prototype.js"></script>
<script src="http://ajax.googleapis.com/ajax/libs/jquery/1.11.1/jquery.min.js"></script>
<script type="text/javascript">
jQuery.noConflict();

var jq = jQuery;

jq(document).ready(function(){
alert("jQuery still works!");
});
</script>
</head>
<body>
</body>
</html>

The code above assigns the jQuery namespace to the variable jq. It's not as cool as the $, but at least it's less typing.

Friday, April 17, 2015

JQuery: Search Context Parameter (Select Within A Container)

There's actually two selector parameters in JQuery.  The second parameter is the context parameter.  The context parameter specify the context that the selector should operate within that context.  Let's use the bootstrap form field markup below as an example:

<!DOCTYPE html>
<html lang="en">
<head>
<meta charset="utf-8" />
<script src="http://code.jquery.com/jquery-1.11.2.min.js"></script>
<script src="https://maxcdn.bootstrapcdn.com/bootstrap/3.3.2/js/bootstrap.min.js"></script>
<!-- Latest compiled and minified CSS -->
<link rel="stylesheet" href="https://maxcdn.bootstrapcdn.com/bootstrap/3.3.2/css/bootstrap.min.css">
<!-- Optional theme -->
<link rel="stylesheet" href="https://maxcdn.bootstrapcdn.com/bootstrap/3.3.2/css/bootstrap-theme.min.css">
<title></title>
<style>
.form-label-spacing{
margin-top: 15px;
}

.form-group-spacing
{
margin-left: 20px;
}
</style>
</head>
<body>
<form>
<div class="row">
<div class="form-group form-group-spacing col-lg-4 col-md-4" id="registration-form">
<label for="firstName" class="form-label-spacing">First Name:</label>
<input class="form-control" type="text" id="firstName" placeholder="First Name">
<label for="firstName" class="form-label-spacing">Last Name:</label>
<input class="form-control" type="text" id="lastName" placeholder="Last Name">
<label class="E-Mail form-label-spacing" for="E-Mail">Email:</label>
<input class="form-control" type="email" id="E-Mail" placeholder="Email">
<label class="form-label-spacing" for="password">Password:</label>
<input name="Password" class="form-control" type="password" placeholder="Password">
<div class="form-group">
<label class="form-label-spacing" for="gender">Gender:</label>
<div class="radio">
<label><input type="radio" name="gender" id="gender">Male</label><br/>
<label><input type="radio" name="gender" id="gender">Female</label>
</div>
</div>

<button type="button" class="btn btn-default">Sign Up</button>

</div>
<div class="col-lg-8 col-md-8"/>
</div>
<div class="row">
<div class="form-group form-group-spacing col-lg-4 col-md-4" id="another-registration-form">
<label for="firstName" class="form-label-spacing">First Name:</label>
<input class="form-control" type="text" id="firstName" placeholder="First Name">
<label for="firstName" class="form-label-spacing">Last Name:</label>
<input class="form-control" type="text" id="lastName" placeholder="Last Name">
<label class="E-Mail form-label-spacing" for="E-Mail">Email:</label>
<input class="form-control" type="email" id="E-Mail" placeholder="Email">
<label class="form-label-spacing" for="password">Password:</label>
<input name="Password" class="form-control" type="password" placeholder="Password">
<div class="form-group">
<label class="form-label-spacing" for="gender">Gender:</label>
<div class="radio">
<label><input type="radio" name="gender" id="gender">Male</label><br/>
<label><input type="radio" name="gender" id="gender">Female</label>
</div>
</div>

<button type="button" class="btn btn-default">Sign Up</button>

</div>
<div class="col-lg-8 col-md-8"/>
</div>
</form>
</body>
</html>

Basically, we've created two duplicate forms with different ids. The form looks like this in the browser:


For this demo will get rid of the placeholders on the first form and leave the second form's placeholder values in place.  We can accomplish this by specifying the search context for the selector using the form id attribute.

To get rid of the placeholders, type the following code inside the <script> tag

  <script>
$(document).ready(function(){
$('input.form-control','#registration-form').removeAttr('placeholder');
});
</script>

The code above selects the input form fields with he class "form-control" and then remove the attribute "placeholder" on the form fields. But because we passed in the id '#registration-form' in the second parameter the "placeholder" attribute is only removed from the first form leaving the second form as is because it is not within the context of the selection.
As you can see from the screen shot below the first firm's placeholder values are gone, however the second form field selector is still intact.

Tuesday, April 14, 2015

JQuery Basics : Selecting Attributes

In the previous blog about selectors we've gone over what a selector is.  In this blog we will something that is a little more advance and use JQuery to select the attributes within a HTML element.  Most HTML elements have attributes associated with them for example the <input> element has the id, name, and type in them. So let's create a typical registration form input fields for this example and use JQuery to select the form fields according to what attributes the form fields have:

<html lang="en">
<head>
<meta charset="utf-8" />
<title>JQuery Attributes Selector Demo</title>
<script src="http://ajax.googleapis.com/ajax/libs/jquery/2.1.3/jquery.min.js"></script>
<script>
</script>
</head>
<body>
<form>
User ID: <input name="UserId" type="text"><br/>
First Name: <input name="First Name" type="text"><br/>
Last Name: <input name="Last Name" type="text"><br/>
E-Mail: <input name="E-Mail" type="text"><br/>
Password: <input name="Password" type="password"><br/>
Gender:
<br/><input type="radio" name="gender" value="male" checked>Male<br/>
<input type="radio" name="gender" value="female">Female<br/>

</form>
</body>
</html>

So the markup up looks like this in the browser:


Now let's use some JQuery to select some attributes!  To make things interesting we will use JQuery to simulate a real user who is filling out a registration form.  Let's say the application assigns a user Id to new user.  We can use the following code to populate the UserId field with an Id with the following JQuery script:

 
$(document).ready(function(){
$('input[name="UserId"]').val(1);
});

The code above selects an input field with the name "UserId" and set the value of the element to 1.  The JQuery selector we use is tag[attribute name = "attribute value"] which is this line in the code
$('input[name="UserId"]').val(1);

This is how the page looks like now in the browser


Now let's fill out the first name and last name field.  To fill out the first name and last name field we are going to do something a little different.  We are going to look for the attribute name value that starts with "First" and for the first name field, and we are going to look for the attribute name value that starts with "Last" for the last name.  We can add the following code to populate the "First Name" and "Last Name" field"

 $(document).ready(function(){
$('input[name="UserId"]').val(1);
$('input[name^="First"]').val("Jane");
$('input[name^="Last"]').val("Doe");
});

The code above uses the ^ symbol to tell JQuery to look for the input element that starts with the text that comes after the ^ symbol. So for example the selector $('input[name^="First"]') looks for input field that has the name that starts with the word "First" and the selector $('input[name^="Last"]') looks for input field that has the name that starts with the word "Last". The HTML page looks like the this after we added the last two lines.


Now we will fill out the E-Mail field using an opposite selector from the previous example.  We are going to look for an input field that ends with the word "Mail".  Add the following code to the existing code.

 $(document).ready(function(){
$('input[name="UserId"]').val(1);
$('input[name^="First"]').val("Jane");
$('input[name^="Last"]').val("Doe");
$('input[name$="Mail"]').val("janedoe@doe.org");
});

In the code that we've just added we use the $= selector symbol to look for the name attribute in the input element that ends with the word "Mail". $('input[name$="Mail"]').  The resulting form looks like this in the browser


Now let's skip the password field and move to the Gender radio button fields.  Since Jane is a woman she wants to change the Gender field from a Male to a Female.  So she uses JQuery to change Gender selection from Male to Female.

So to select "Female" as the "Gender" type in the following code.
  <script>
$(document).ready(function(){
$('input[name="UserId"]').val(1);
$('input[name^="First"]').val("Jane");
$('input[name^="Last"]').val("Doe");
$('input[name$="Mail"]').val("janedoe@doe.org");
$( "input[name=gender]:radio" ).val('female').prop('checked',true);
});
</script>

The code above uses the :radio selector to select a radio input type with the name=gender with the value female.  Then use the .prop method to set the radio button with the female value to true.  The resulting form looks like this in the browser.


JQuery Basics : Selecting Attributes

In the previous blog about selectors we've gone over what a selector is.  In this blog we will something that is a little more advance and use JQuery to select the attributes within a HTML element.  Most HTML elements have attributes associated with them for example the <input> element has the id, name, and type in them. So let's create a typical registration form input fields for this example and use JQuery to select the form fields according to what attributes the form fields have:

<html lang="en">
<head>
<meta charset="utf-8" />
<title>JQuery Attributes Selector Demo</title>
<script src="http://ajax.googleapis.com/ajax/libs/jquery/2.1.3/jquery.min.js"></script>
<script>
</script>
</head>
<body>
<form>
User ID: <input name="UserId" type="text"><br/>
First Name: <input name="First Name" type="text"><br/>
Last Name: <input name="Last Name" type="text"><br/>
E-Mail: <input name="E-Mail" type="text"><br/>
Password: <input name="Password" type="password"><br/>
Gender:
<br/><input type="radio" name="gender" value="male" checked>Male<br/>
<input type="radio" name="gender" value="female">Female<br/>

</form>
</body>
</html>

So the markup up looks like this in the browser:


Now let's use some JQuery to select some attributes!  To make things interesting we will use JQuery to simulate a real user who is filling out a registration form.  Let's say the application assigns a user Id to new user.  We can use the following code to populate the UserId field with an Id with the following JQuery script:

 
$(document).ready(function(){
$('input[name="UserId"]').val(1);
});

The code above selects an input field with the name "UserId" and set the value of the element to 1.  The JQuery selector we use is tag[attribute name = "attribute value"] which is this line in the code
$('input[name="UserId"]').val(1);

This is how the page looks like now in the browser


Now let's fill out the first name and last name field.  To fill out the first name and last name field we are going to do something a little different.  We are going to look for the attribute name value that starts with "First" and for the first name field, and we are going to look for the attribute name value that starts with "Last" for the last name.  We can add the following code to populate the "First Name" and "Last Name" field"

 $(document).ready(function(){
$('input[name="UserId"]').val(1);
$('input[name^="First"]').val("Jane");
$('input[name^="Last"]').val("Doe");
});
The code above uses the ^ symbol to tell JQuery to look for the input element that starts with the text that comes after the ^ symbol. So for example the selector $('input[name^="First"]') looks for input field that has the name that starts with the word "First" and the selector $('input[name^="Last"]') looks for input field that has the name that starts with the word "Last". The HTML page looks like the this after we added the last two lines.


Now we will fill out the E-Mail field using an opposite selector from the previous example.  We are going to look for an input field that ends with the word "Mail".  Add the following code to the existing code.

 $(document).ready(function(){
$('input[name="UserId"]').val(1);
$('input[name^="First"]').val("Jane");
$('input[name^="Last"]').val("Doe");
$('input[name$="Mail"]').val("janedoe@doe.org");
});

In the code that we've just added we use the $= selector symbol to look for the name attribute in the input element that ends with the word "Mail". $('input[name$="Mail"]').  The resulting form looks like this in the browser


Now let's skip the password field and move to the Gender radio button fields.  Since Jane is a woman she wants to change the Gender field from a Male to a Female.  So she uses JQuery to change Gender selection from Male to Female.

So to select "Female" as the "Gender" type in the following code.
  <script>
$(document).ready(function(){
$('input[name="UserId"]').val(1);
$('input[name^="First"]').val("Jane");
$('input[name^="Last"]').val("Doe");
$('input[name$="Mail"]').val("janedoe@doe.org");
$( "input[name=gender]:radio" ).val('female').prop('checked',true);
});
</script>

The code above uses the :radio selector to select a radio input type with the name=gender with the value female.  Then use the .prop method to set the radio button with the female value to true.  The resulting form looks like this in the browser.