Showing posts with label Graphics Design. Show all posts

Thursday, April 2, 2015

GIMP: Cropping An Image


Cropping an image is something that you will do often when you want to take out parts of the photo is uninteresting or distracting.  For this blog we will be using the Key West photo that we resized in this blog.

Photo of Key West


Step By Step Instructions.

1.  Open the Key West photo in GIMP by clicking on File → Open

GIMP open photo


2.  Browse to the location that you saved the Key West photo in, then click "Open"

GIMP open photo select


3.  If you are asked the to convert the photo to RGB, click on "Keep"

GIMP RGB converstion

4.  The Key West photo is opened in GIMP

GIMP single window mode

5. To crop the photo, click the "Crop" tool

GIMP crop tool


6. Once the "Crop" tool has been selected, make the selection of the part of the photo that you wanted to keep.  You will see that the outside area of the selection has dimmed down.

GIMP crop selection


7.  You can adjust the selection box to your liking.  To crop the image press the "Enter" key on your keyboard.  And the dimmed area of the photo will be gone.

GIMP cropped photo


GIMP: Cropping An Image

Cropping an image is something that you will do often when you want to take out parts of the photo is uninteresting or distracting.  For this blog we will be using the Key West photo that we resized in this blog.

Photo of Key West


Step By Step Instructions.

1.  Open the Key West photo in GIMP by clicking on File → Open

GIMP open photo


2.  Browse to the location that you saved the Key West photo in, then click "Open"

GIMP open photo select


3.  If you are asked the to convert the photo to RGB, click on "Keep"

GIMP RGB converstion

4.  The Key West photo is opened in GIMP

GIMP single window mode

5. To crop the photo, click the "Crop" tool

GIMP crop tool


6. Once the "Crop" tool has been selected, make the selection of the part of the photo that you wanted to keep.  You will see that the outside area of the selection has dimmed down.

GIMP crop selection


7.  You can adjust the selection box to your liking.  To crop the image press the "Enter" key on your keyboard.  And the dimmed area of the photo will be gone.

GIMP cropped photo


Tuesday, March 31, 2015

GIMP: Resize A Large Photo


Resizing images is a common task that you have to do to show your photo image on a website.  Most digital camera or smart phones takes photos that are a lot larger than what most web sites can display in it's original size.  In this blog we will show you how to resize your photo in GIMP.

Step By Step Instructions:

1.  Open the original photo in GIMP

GIMP original photo size

As you can see the photo has the dimension of 2048x1530, not suitable for web display

2. Click Image → Scale Image

GIMP scale image


3.  The "Scale Image" dialog box will be displayed.  The link icon   puts a constrain on the width and the height to be propositional.  Usually it is the best option, however you need to specify an exact width and height value you can click on the link icon to input your own width and height.  For this blog we will leave the width and height linked.

GIMP scale image width and height settings

4.  Type in the new width and height for the image, for this image I am going to type in 600 for the width, the height field will be adjusted automatically to be proportionate with the new width.  Note you have to click on the height field for the height to be adjusted.  This might be a bug.  Click on the "Scale" button, and the image will be resized.

GIMP resized image

As you can see from the top status bar the image now has the dimension of 600x448

5.  Now that we have the resized image we can export our image as a .jpeg file

6.  To export the image click File → Export As, once the "Export Image" dialog is displayed, expand the "Select File_Type (By Extension)

GIMP export image dialog

7.  Select "JPEG image" File Type

GIMP JPEG image File Type

8.   In the "Name" field give your resized photo a name.

GIMP eport file name


9.  Click the "Export" button


10.  Accept the default export settings, and then click "Export" again

GIMP export default settings

And here is the resized photo, suitable for the web.

GIMP resized photo

GIMP: Resize A Large Photo

Resizing images is a common task that you have to do to show your photo image on a website.  Most digital camera or smart phones takes photos that are a lot larger than what most web sites can display in it's original size.  In this blog we will show you how to resize your photo in GIMP.

Step By Step Instructions:

1.  Open the original photo in GIMP

GIMP original photo size

As you can see the photo has the dimension of 2048x1530, not suitable for web display

2. Click Image → Scale Image

GIMP scale image


3.  The "Scale Image" dialog box will be displayed.  The link icon   puts a constrain on the width and the height to be propositional.  Usually it is the best option, however you need to specify an exact width and height value you can click on the link icon to input your own width and height.  For this blog we will leave the width and height linked.

GIMP scale image width and height settings

4.  Type in the new width and height for the image, for this image I am going to type in 600 for the width, the height field will be adjusted automatically to be proportionate with the new width.  Note you have to click on the height field for the height to be adjusted.  This might be a bug.  Click on the "Scale" button, and the image will be resized.

GIMP resized image

As you can see from the top status bar the image now has the dimension of 600x448

5.  Now that we have the resized image we can export our image as a .jpeg file

6.  To export the image click File → Export As, once the "Export Image" dialog is displayed, expand the "Select File_Type (By Extension)

GIMP export image dialog

7.  Select "JPEG image" File Type

GIMP JPEG image File Type

8.   In the "Name" field give your resized photo a name.

GIMP eport file name


9.  Click the "Export" button


10.  Accept the default export settings, and then click "Export" again

GIMP export default settings

And here is the resized photo, suitable for the web.

GIMP resized photo

Monday, March 30, 2015

GIMP Layout : Single Window Mode


Most new users to GIMP gets intimidated with the floating windows that is the default view when you first open GIMP.

GIMP default view

As you can see it is pretty intimidating, the majority of users sees this interface and runs back to GIMP's more expensive alternatives. Even though GIMP has most of the features of the more expensive softwares.   Most back end developers I encountered would hear good things about GIMP, download the software.  Get all excited about it, then when they first open it, their reaction is what in the world !@#$$$ (NC-17 censored) is this.  They would go back and use paint as their photo editor.  Which is a shame, because GIMP is quite powerful.

 However, there's a very easy solution to this UI dilemma and make GIMP more user friendly.

Step-By-Step Instructions:
  1.  Click → Windows → Single Window Mode
  2.  GIMP will dock all the floating windows into a single window, looking like all the other conventional programs that you are used to
GIMP Single Window Mode

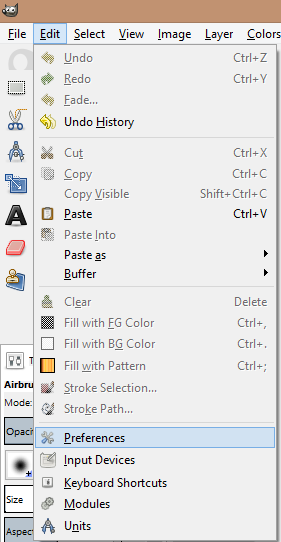
3.  The next step is optional, if you feel more comfortable with the single window mode, you can save the current positions by clicking on Edit → Preferences

GIMP preferences


4. In the Preferences dialog, select "Window Management", then click on the button "Save Window Postions Now",  make sure the "Save window positions on exit" is checked, then click "OK"

GIMP Save Window Positions Now

5.  Now close GIMP and open it again, you will see that the single window mode is used instead of the default view.

GIMP single window interface

    GIMP Layout : Single Window Mode

    Most new users to GIMP gets intimidated with the floating windows that is the default view when you first open GIMP.

    GIMP default view

    As you can see it is pretty intimidating, the majority of users sees this interface and runs back to GIMP's more expensive alternatives. Even though GIMP has most of the features of the more expensive softwares.   Most back end developers I encountered would hear good things about GIMP, download the software.  Get all excited about it, then when they first open it, their reaction is what in the world !@#$$$ (NC-17 censored) is this.  They would go back and use paint as their photo editor.  Which is a shame, because GIMP is quite powerful.

     However, there's a very easy solution to this UI dilemma and make GIMP more user friendly.

    Step-By-Step Instructions:
    1.  Click → Windows → Single Window Mode
    2.  GIMP will dock all the floating windows into a single window, looking like all the other conventional programs that you are used to
    GIMP Single Window Mode

    3.  The next step is optional, if you feel more comfortable with the single window mode, you can save the current positions by clicking on Edit → Preferences

    GIMP preferences


    4. In the Preferences dialog, select "Window Management", then click on the button "Save Window Postions Now",  make sure the "Save window positions on exit" is checked, then click "OK"

    GIMP Save Window Positions Now

    5.  Now close GIMP and open it again, you will see that the single window mode is used instead of the default view.

    GIMP single window interface